The primary differences between welding aluminum and steel lie in their thermal conductivity, melting points, and surface oxidation behaviors. Imagine a busy fabrication shop where you are rushing to fulfill a high-stakes order, only to find that your latest batch of components is riddled with cracks or severe warping. A failed weld on heavy-duty equipment isn’t just a waste of material; it’s a significant safety hazard that can compromise the integrity of structural parts like Moose Bumpers. Understanding the specific nuances of steel vs aluminum welding allows you to adapt your technique and equipment to ensure every joint meets the highest industrial standards.
Here is the kicker: treating these two metals the same is a recipe for project failure.
How does prep differ for steel vs aluminum welding?
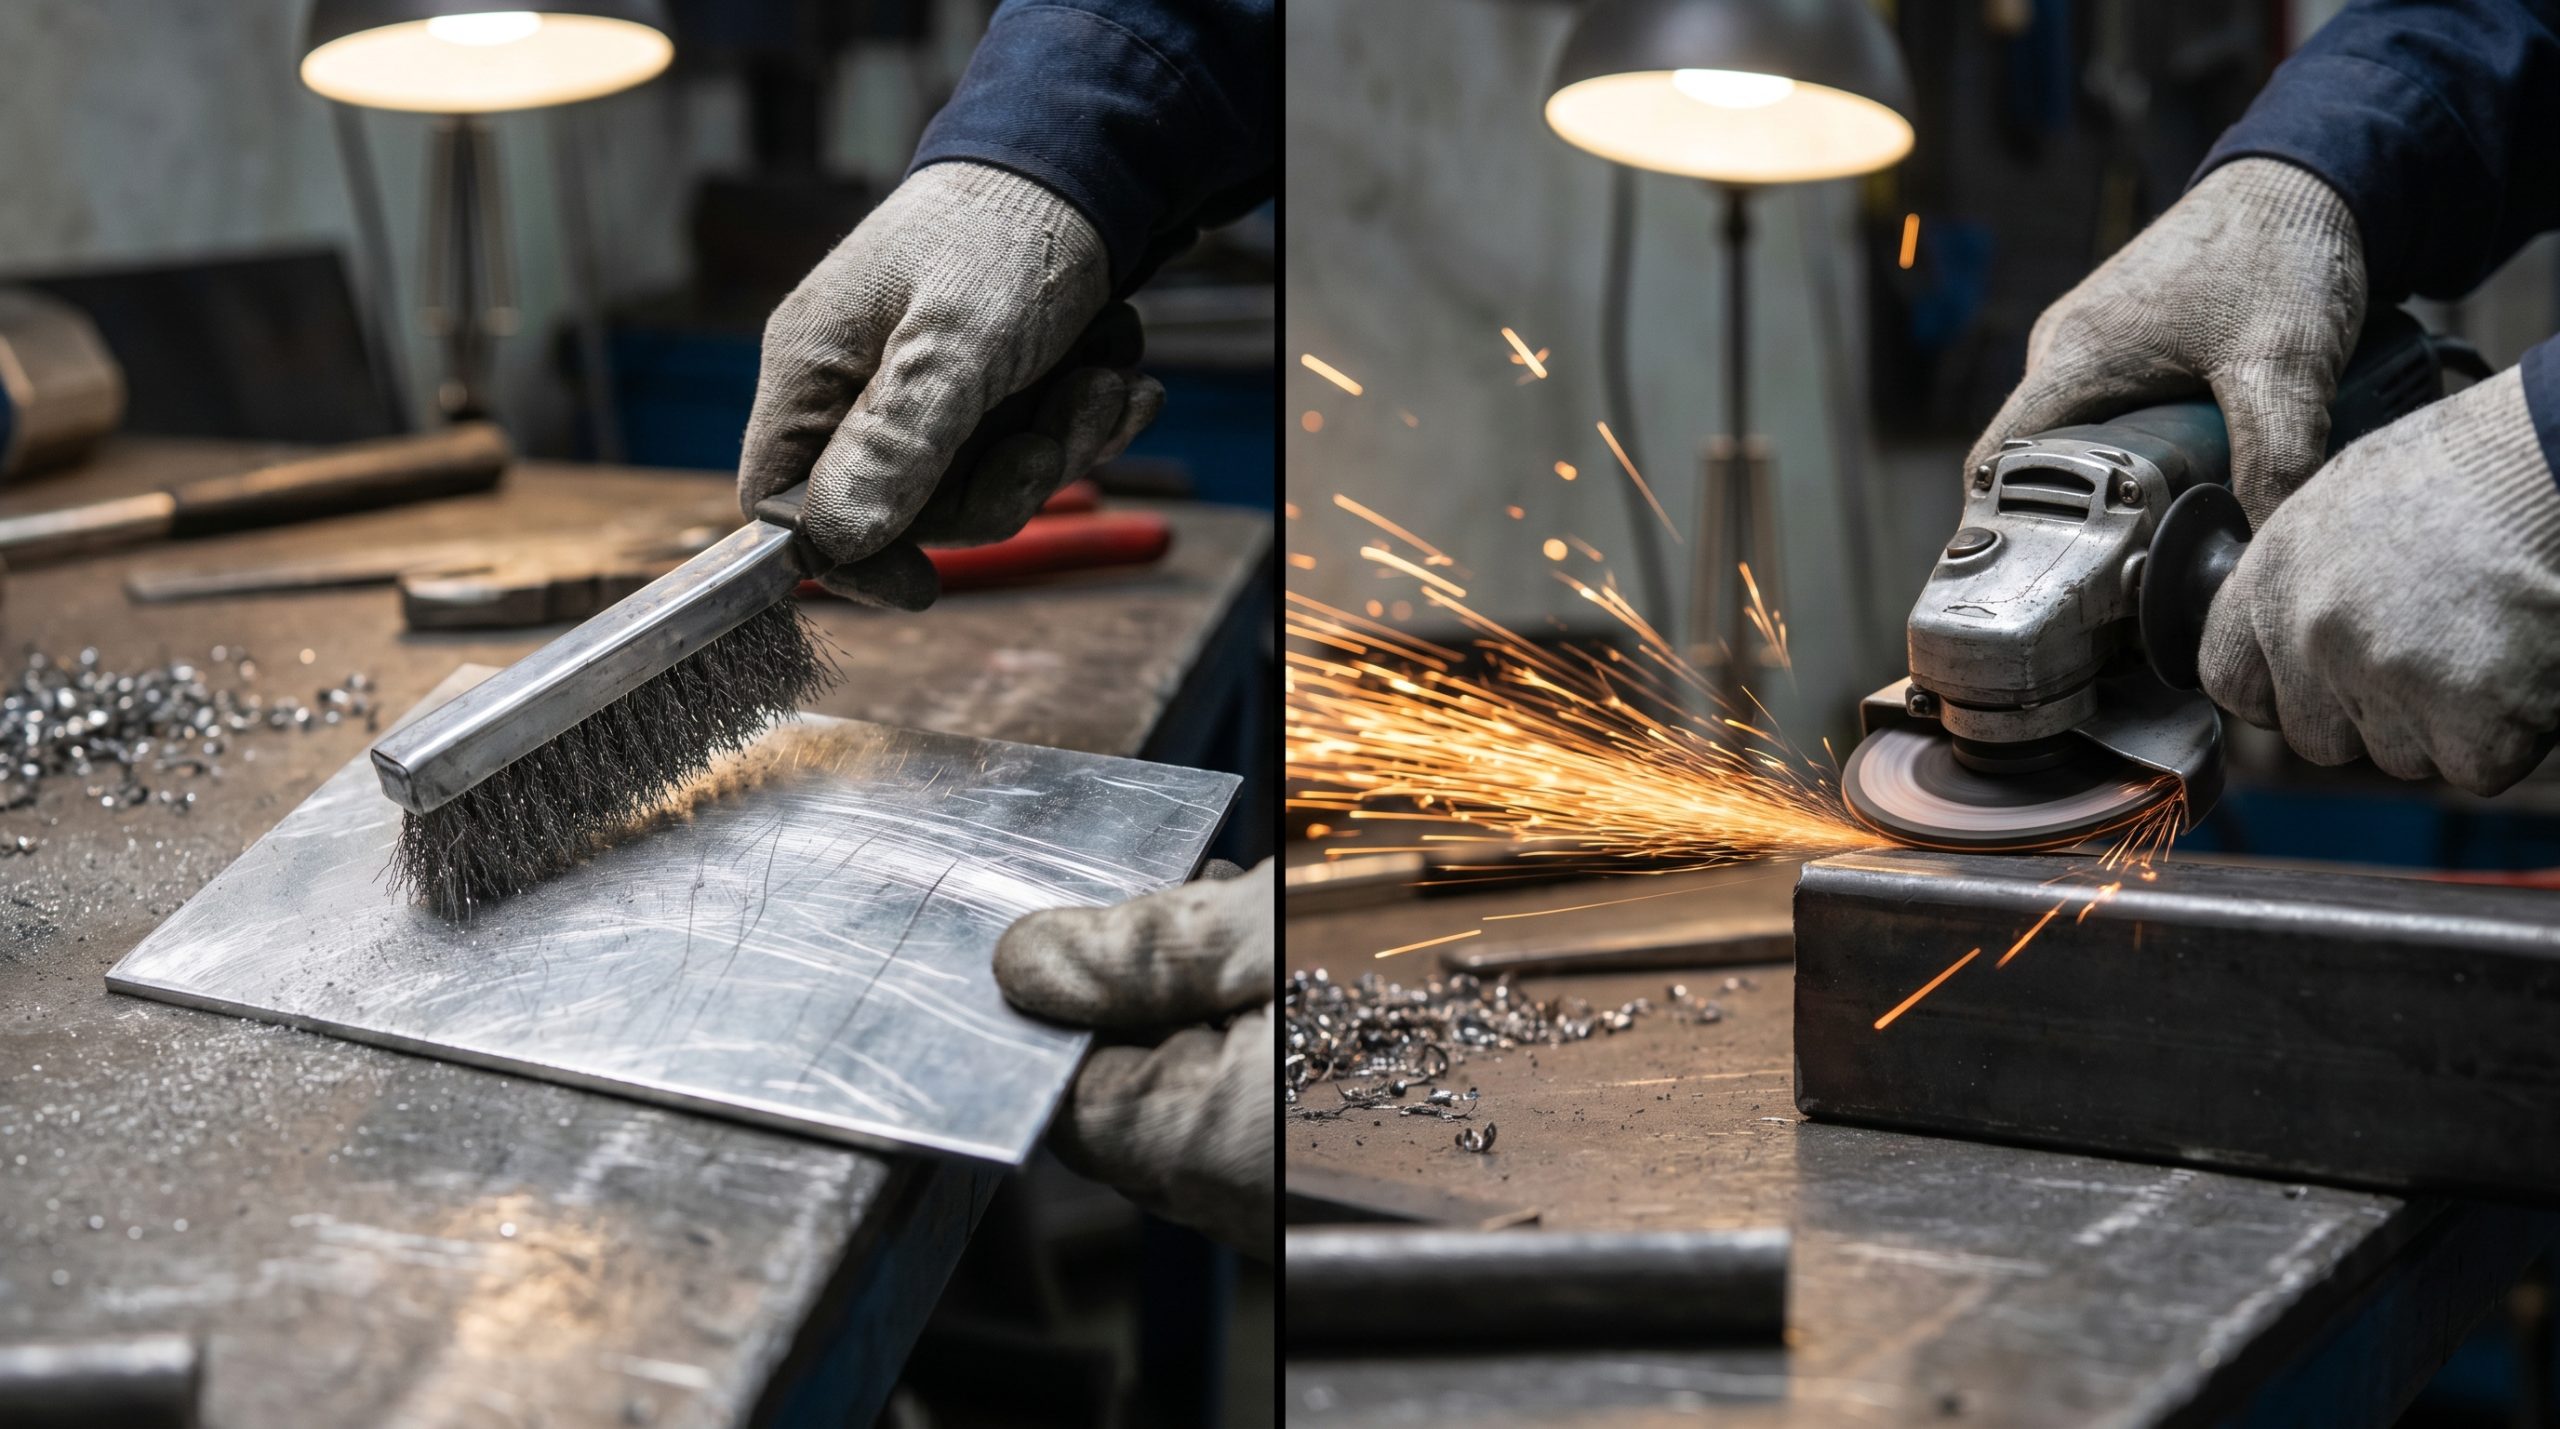
Aluminum requires an aggressive approach to removing its stubborn oxide layer, while steel preparation focuses more on grinding away mill scale and rust. When you are fabricating custom Truck Bodies, the success of the project depends on your mastery of steel vs aluminum welding preparation techniques. Because aluminum oxide melts at a much higher temperature than the base metal, failing to clean the surface properly results in inclusions that weaken the structural bond.
Stripping the oxide layer from aluminum
Aluminum naturally forms a protective oxide coating that acts as an insulator during the welding process. To ensure a clean fuse, you must use a dedicated stainless steel wire brush that has never touched other metals.
- Always brush in one direction to avoid embedding contaminants.
- Use acetone to remove oils and moisture immediately before the arc starts.
- Clean only the area you intend to weld within the next hour to prevent re-oxidation.
Managing steel surface contaminants
Steel is generally more forgiving but still requires a clean surface to prevent porosity and slag inclusions. You should focus on removing “mill scale,” the flaky blue-black layer found on hot-rolled steel.
- Grind surfaces down to shiny “bright metal” for the best results.
- Remove any oil or grease using industrial-grade degreasers.
- Ensure the metal is completely dry to prevent hydrogen embrittlement.
Key Takeaway
Proper preparation reduces the risk of weld defects and ensures that your final product maintains its structural integrity under heavy loads.
| Prep Factor | Aluminum Requirement | Steel Requirement |
|---|---|---|
| Cleaning Tool | Stainless steel brush (dedicated) | Grinder or wire wheel |
| Solvent Use | Mandatory acetone cleaning | Optional degreasing |
| Oxide Management | Must remove high-melt oxide | Remove mill scale and rust |
Rigorous surface cleaning is the single most important step for achieving X-ray quality results in non-ferrous alloys.
What is the heat gap in steel vs aluminum welding?
Aluminum has a thermal conductivity rate nearly five times higher than steel, which means it whisks heat away from the weld zone almost as fast as you can apply it. This massive disparity is a central challenge in steel vs aluminum welding for any professional fabricator. While steel holds heat in a localized area, aluminum acts like a giant heat sink, requiring much higher initial amperage to establish a puddle.
Understanding thermal conductivity
The high conductivity of aluminum means you must “hit it hard and move fast” to prevent the entire workpiece from overheating. If you linger too long, you risk burning through the material or causing a total collapse of the joint.
- Aluminum requires high-amperage starts to overcome heat dissipation.
- Steel allows for a slower, more deliberate travel speed.
- Preheating thick aluminum sections can help maintain a consistent puddle.
But wait, there’s more.
Travel speed and puddle control
Because aluminum moves heat so quickly, your travel speed must be significantly faster than when working with carbon steel. You have a very narrow window to balance penetration and heat input before the metal reaches a critical state.
- Maintain a “push” angle for better shielding gas coverage on aluminum.
- Monitor the puddle closely as it can turn from solid to liquid without warning.
- Use foot pedals to adjust amperage in real-time as the metal saturates with heat.
Key Takeaway
Mastering the heat gap allows you to prevent burn-through on thin gauges while ensuring full penetration on heavy structural components.
| Thermal Property | Aluminum | Steel |
|---|---|---|
| Conductivity | High (fast dissipation) | Low (localized heat) |
| Travel Speed | Very Fast | Moderate to Slow |
| Amperage Needs | High start, then taper | Consistent throughout |
Managing heat sink effects is the primary technical hurdle when transitioning from ferrous to non-ferrous fabrication.
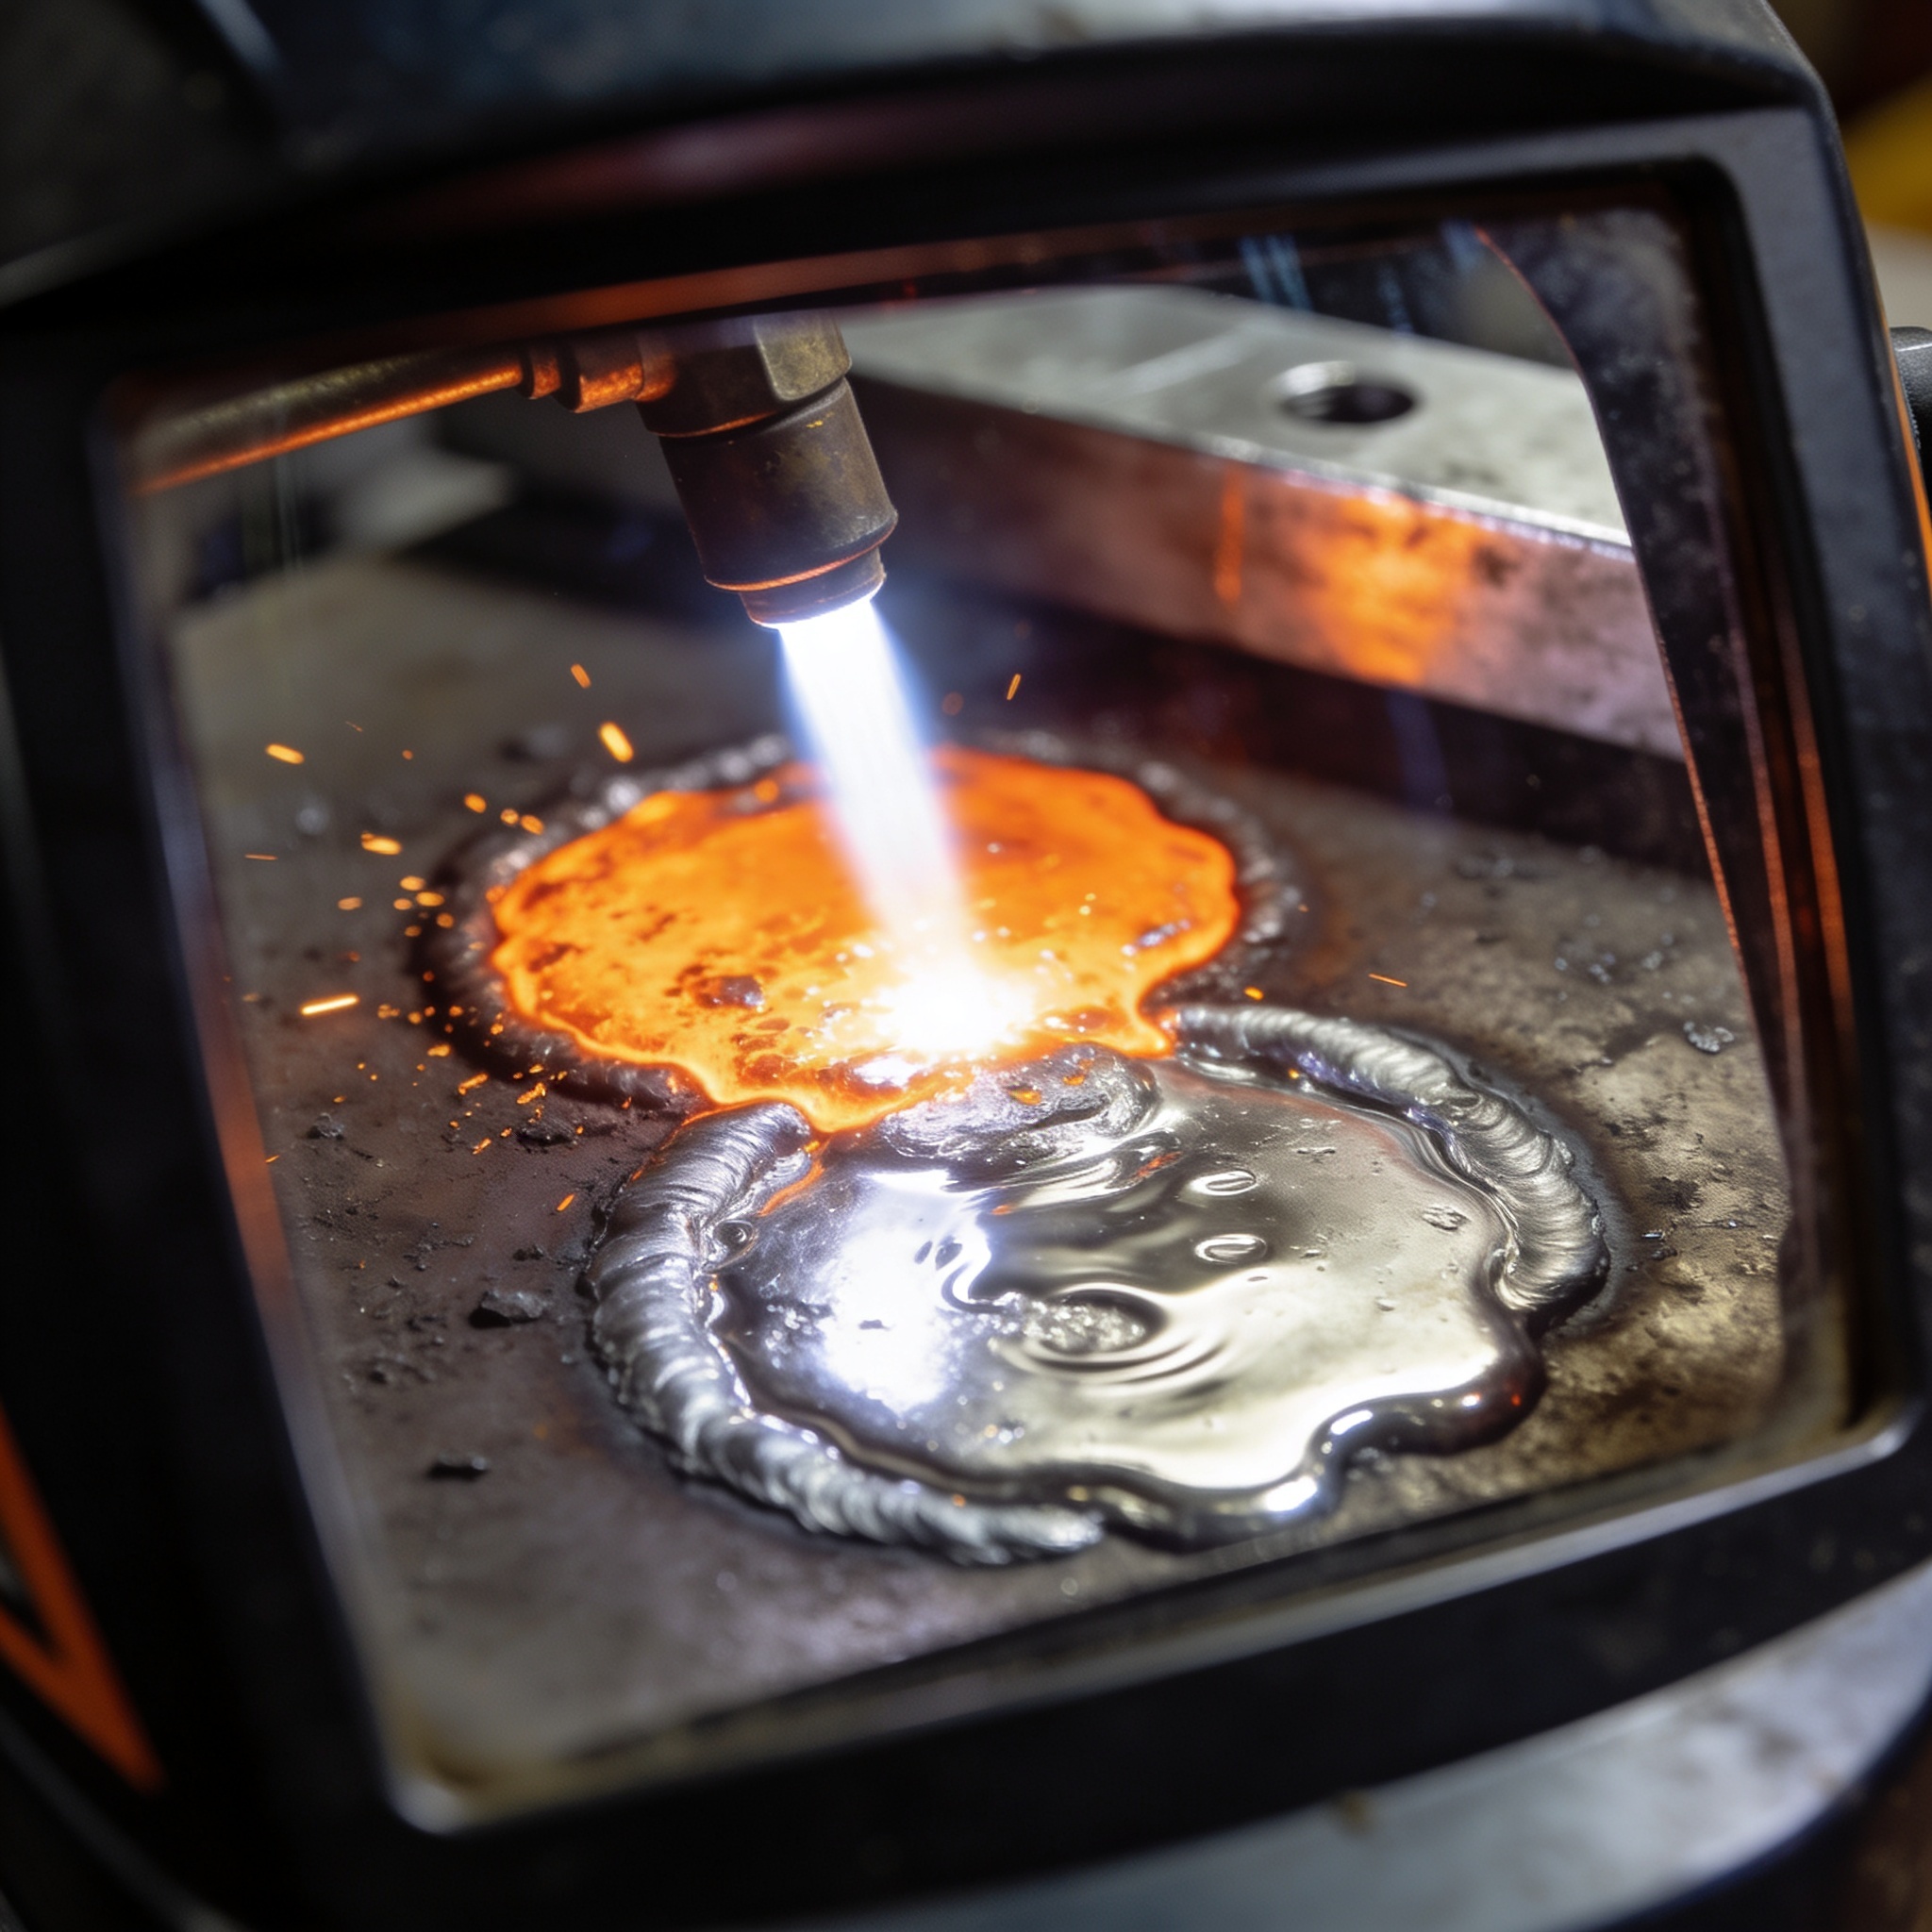
Why are melting points key in steel vs aluminum welding?
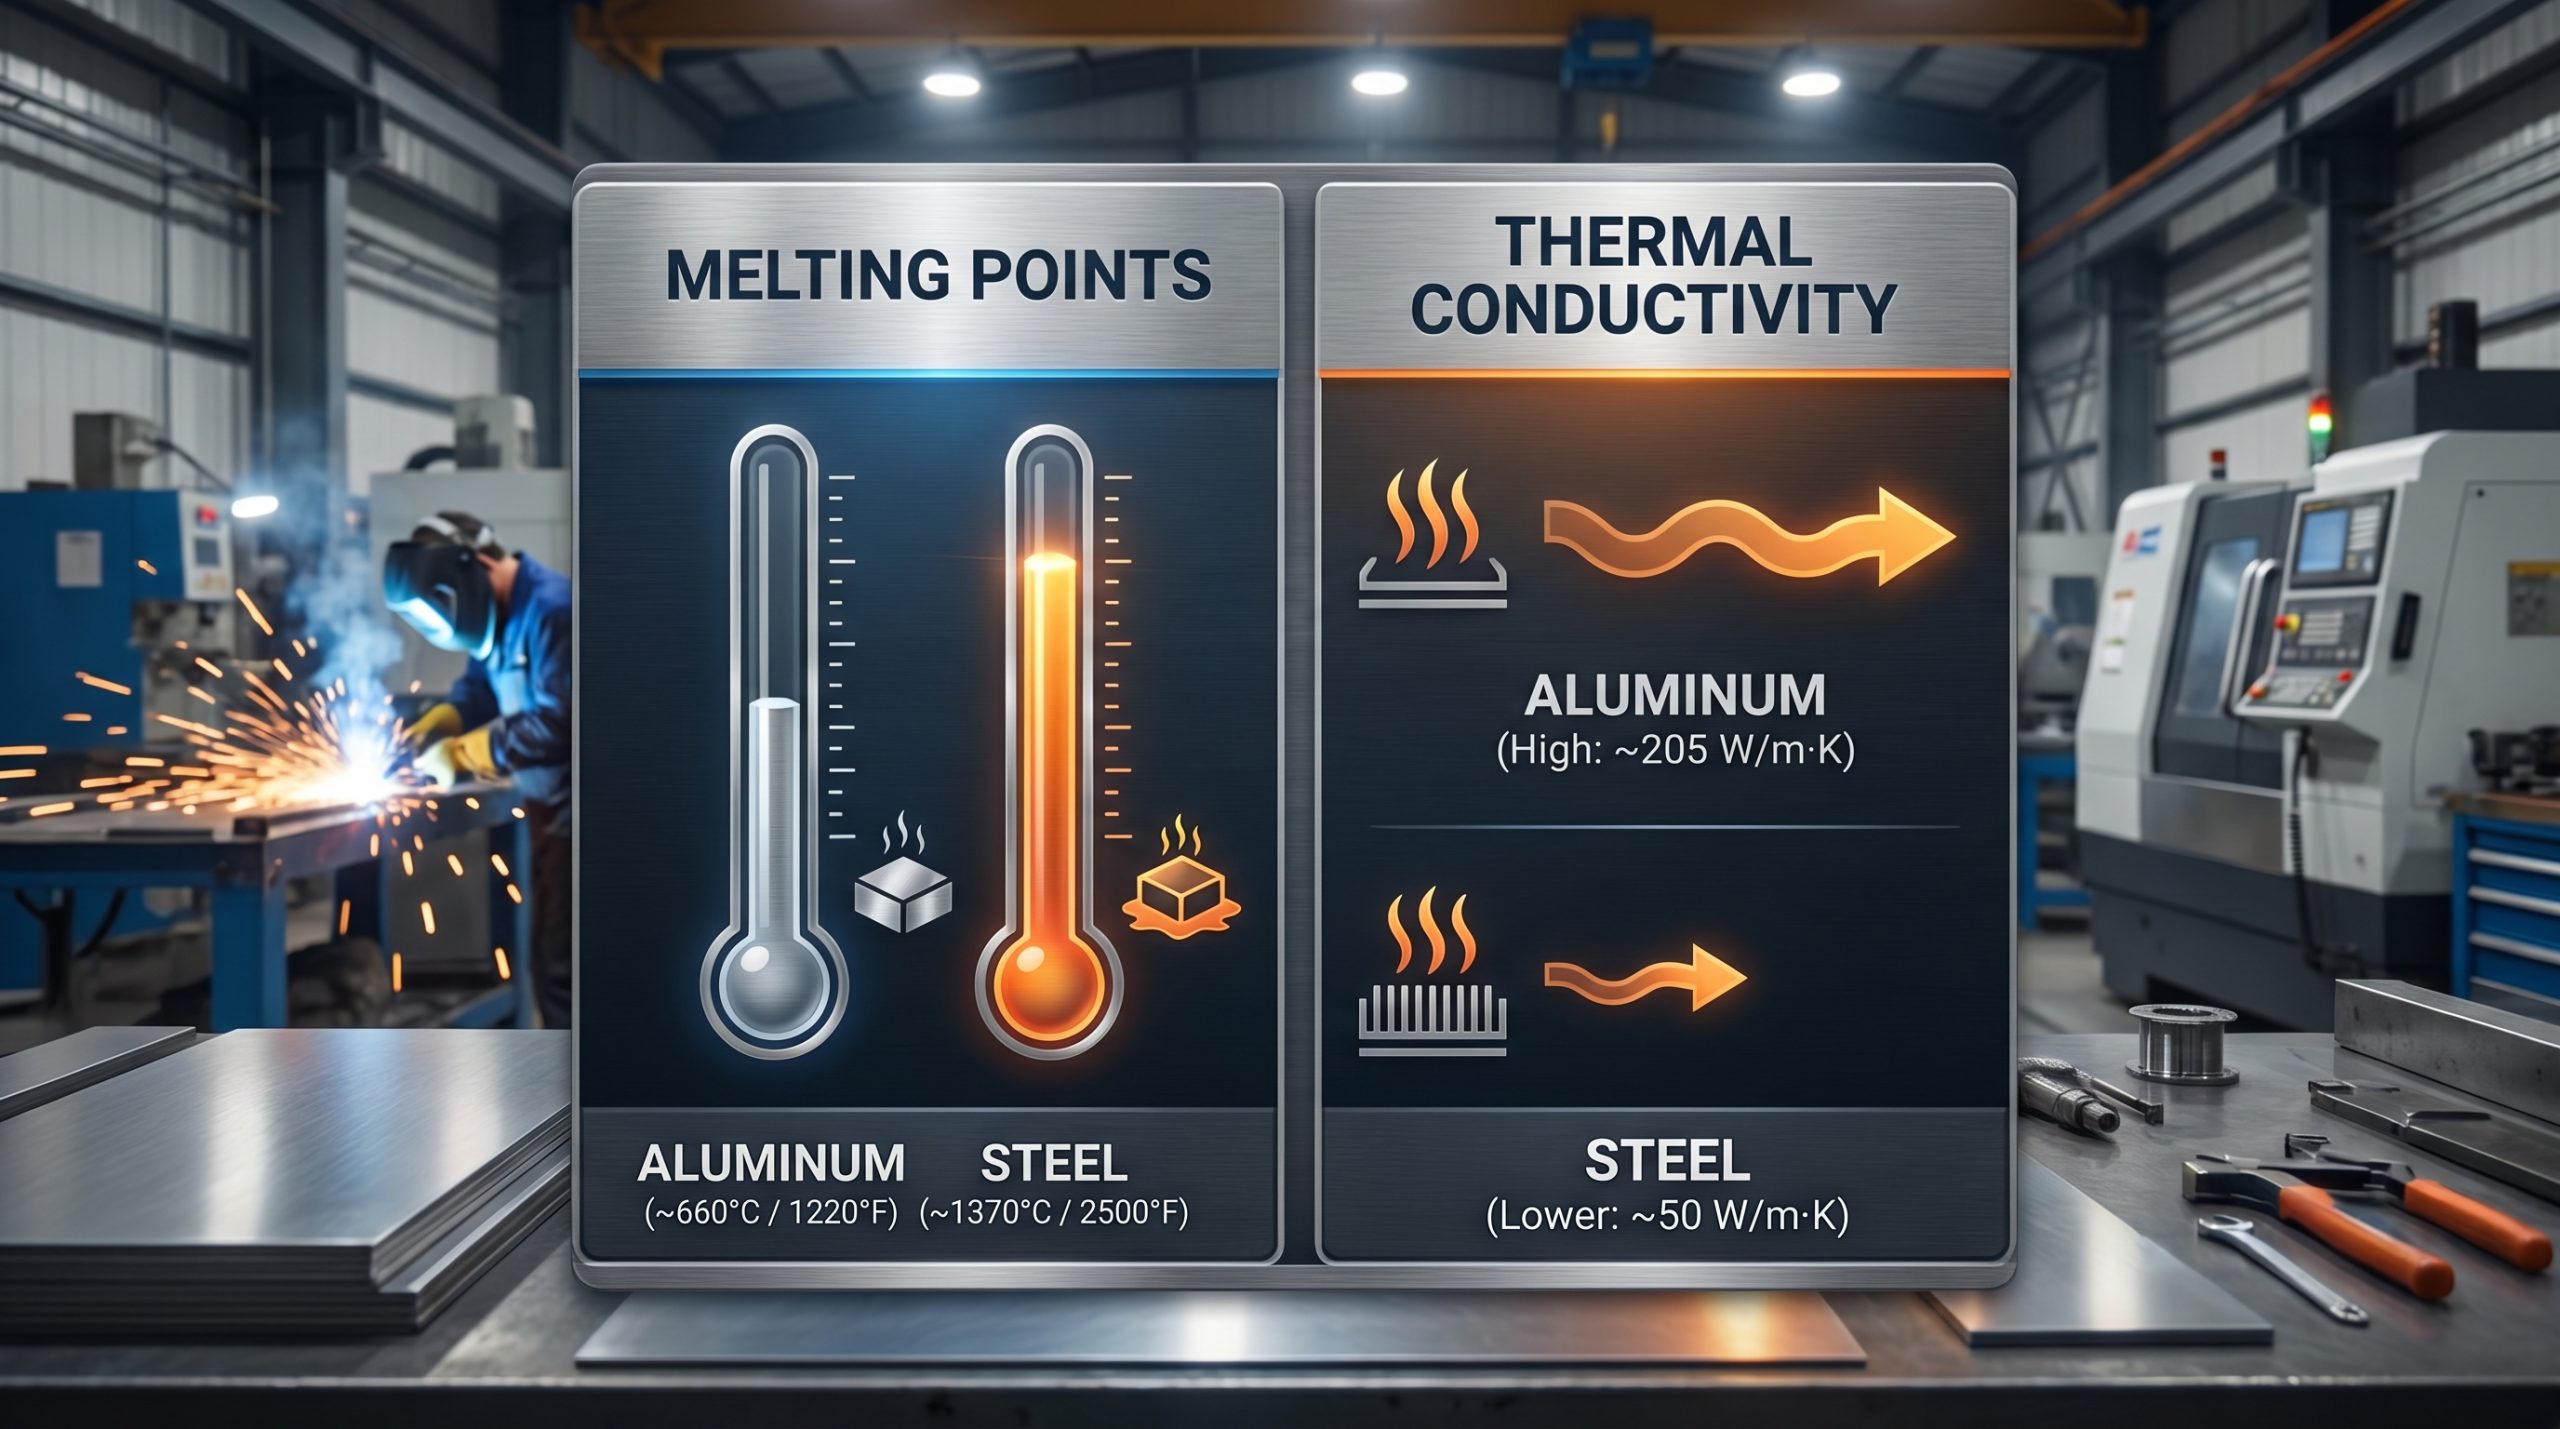
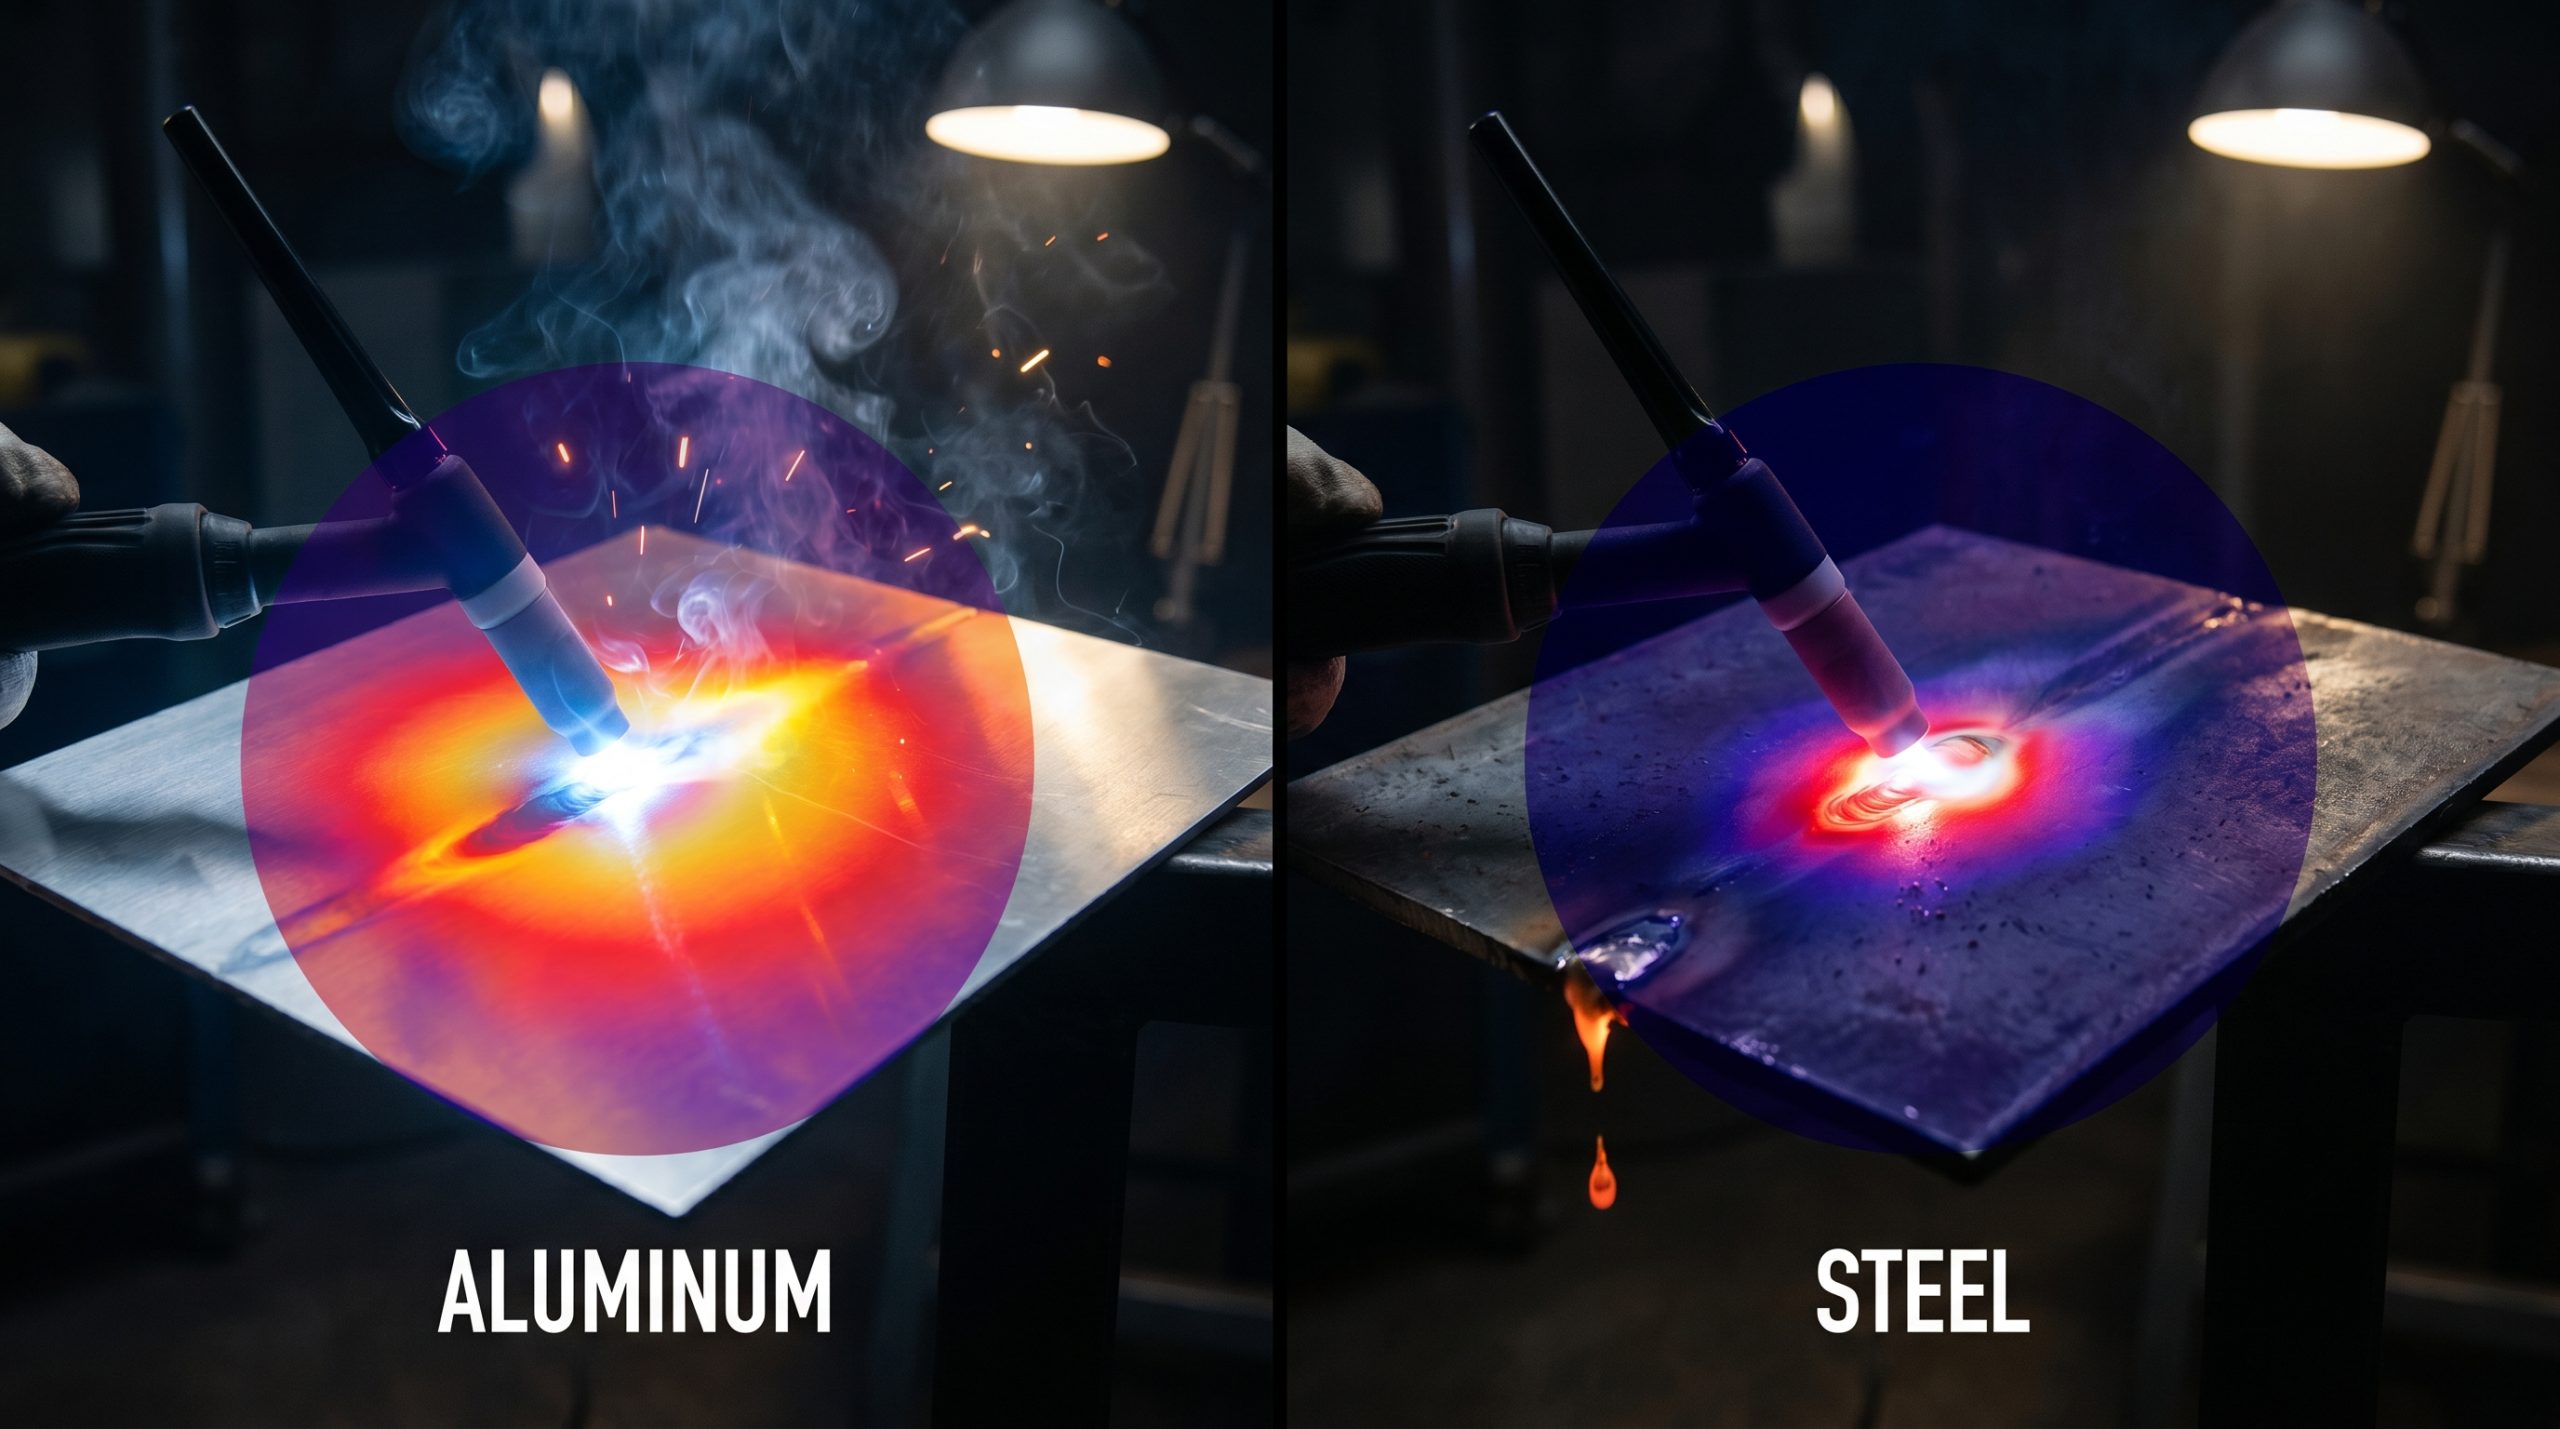
Steel melts at approximately 2,500°F (1,370°C), whereas aluminum liquefies at a much lower 1,220°F (660°C). When manufacturing protective Grille Guards, this temperature difference dictates how you configure your power source and manage the weld pool. The complexity of steel vs aluminum welding is heightened by the fact that aluminum does not change color before it melts, giving you no visual warning of an impending blowout.
The “Orange Glow” vs. The “Shiny Puddle”
Steel provides excellent visual feedback by glowing bright orange as it approaches its melting point. This allows you to judge the temperature and penetration depth simply by looking through your helmet.
- Steel turns red, then orange, then white-hot.
- Aluminum remains silver until it suddenly collapses into a liquid state.
- Lighting and helmet shade are more critical for seeing the aluminum puddle clearly.
Amperage settings for low-temp alloys
Since aluminum melts at a lower temperature, it requires less total energy to liquefy, but its high conductivity means you need high power to get the process started. You must find the “sweet spot” where the arc is hot enough to penetrate but the travel speed is fast enough to prevent melting the surrounding area.
- Set your machine for a “hot start” if your equipment allows.
- Be prepared to back off the amperage as the weld progresses.
- Use pulse settings to manage the average heat input on thin sheets.
It gets better.
Key Takeaway
Understanding these thermal limits prevents catastrophic material failure and ensures your welds are aesthetically clean and structurally sound.
| Temperature Metric | Aluminum | Steel |
|---|---|---|
| Melting Point | ~1,220°F | ~2,500°F |
| Visual Warning | None (stays silver) | Glows orange/red |
| Risk Factor | High sudden blowout | Gradual warping |
The lack of a color change in aluminum necessitates a much higher level of operator focus and experience to maintain puddle control.
Which fillers work for steel vs aluminum welding?
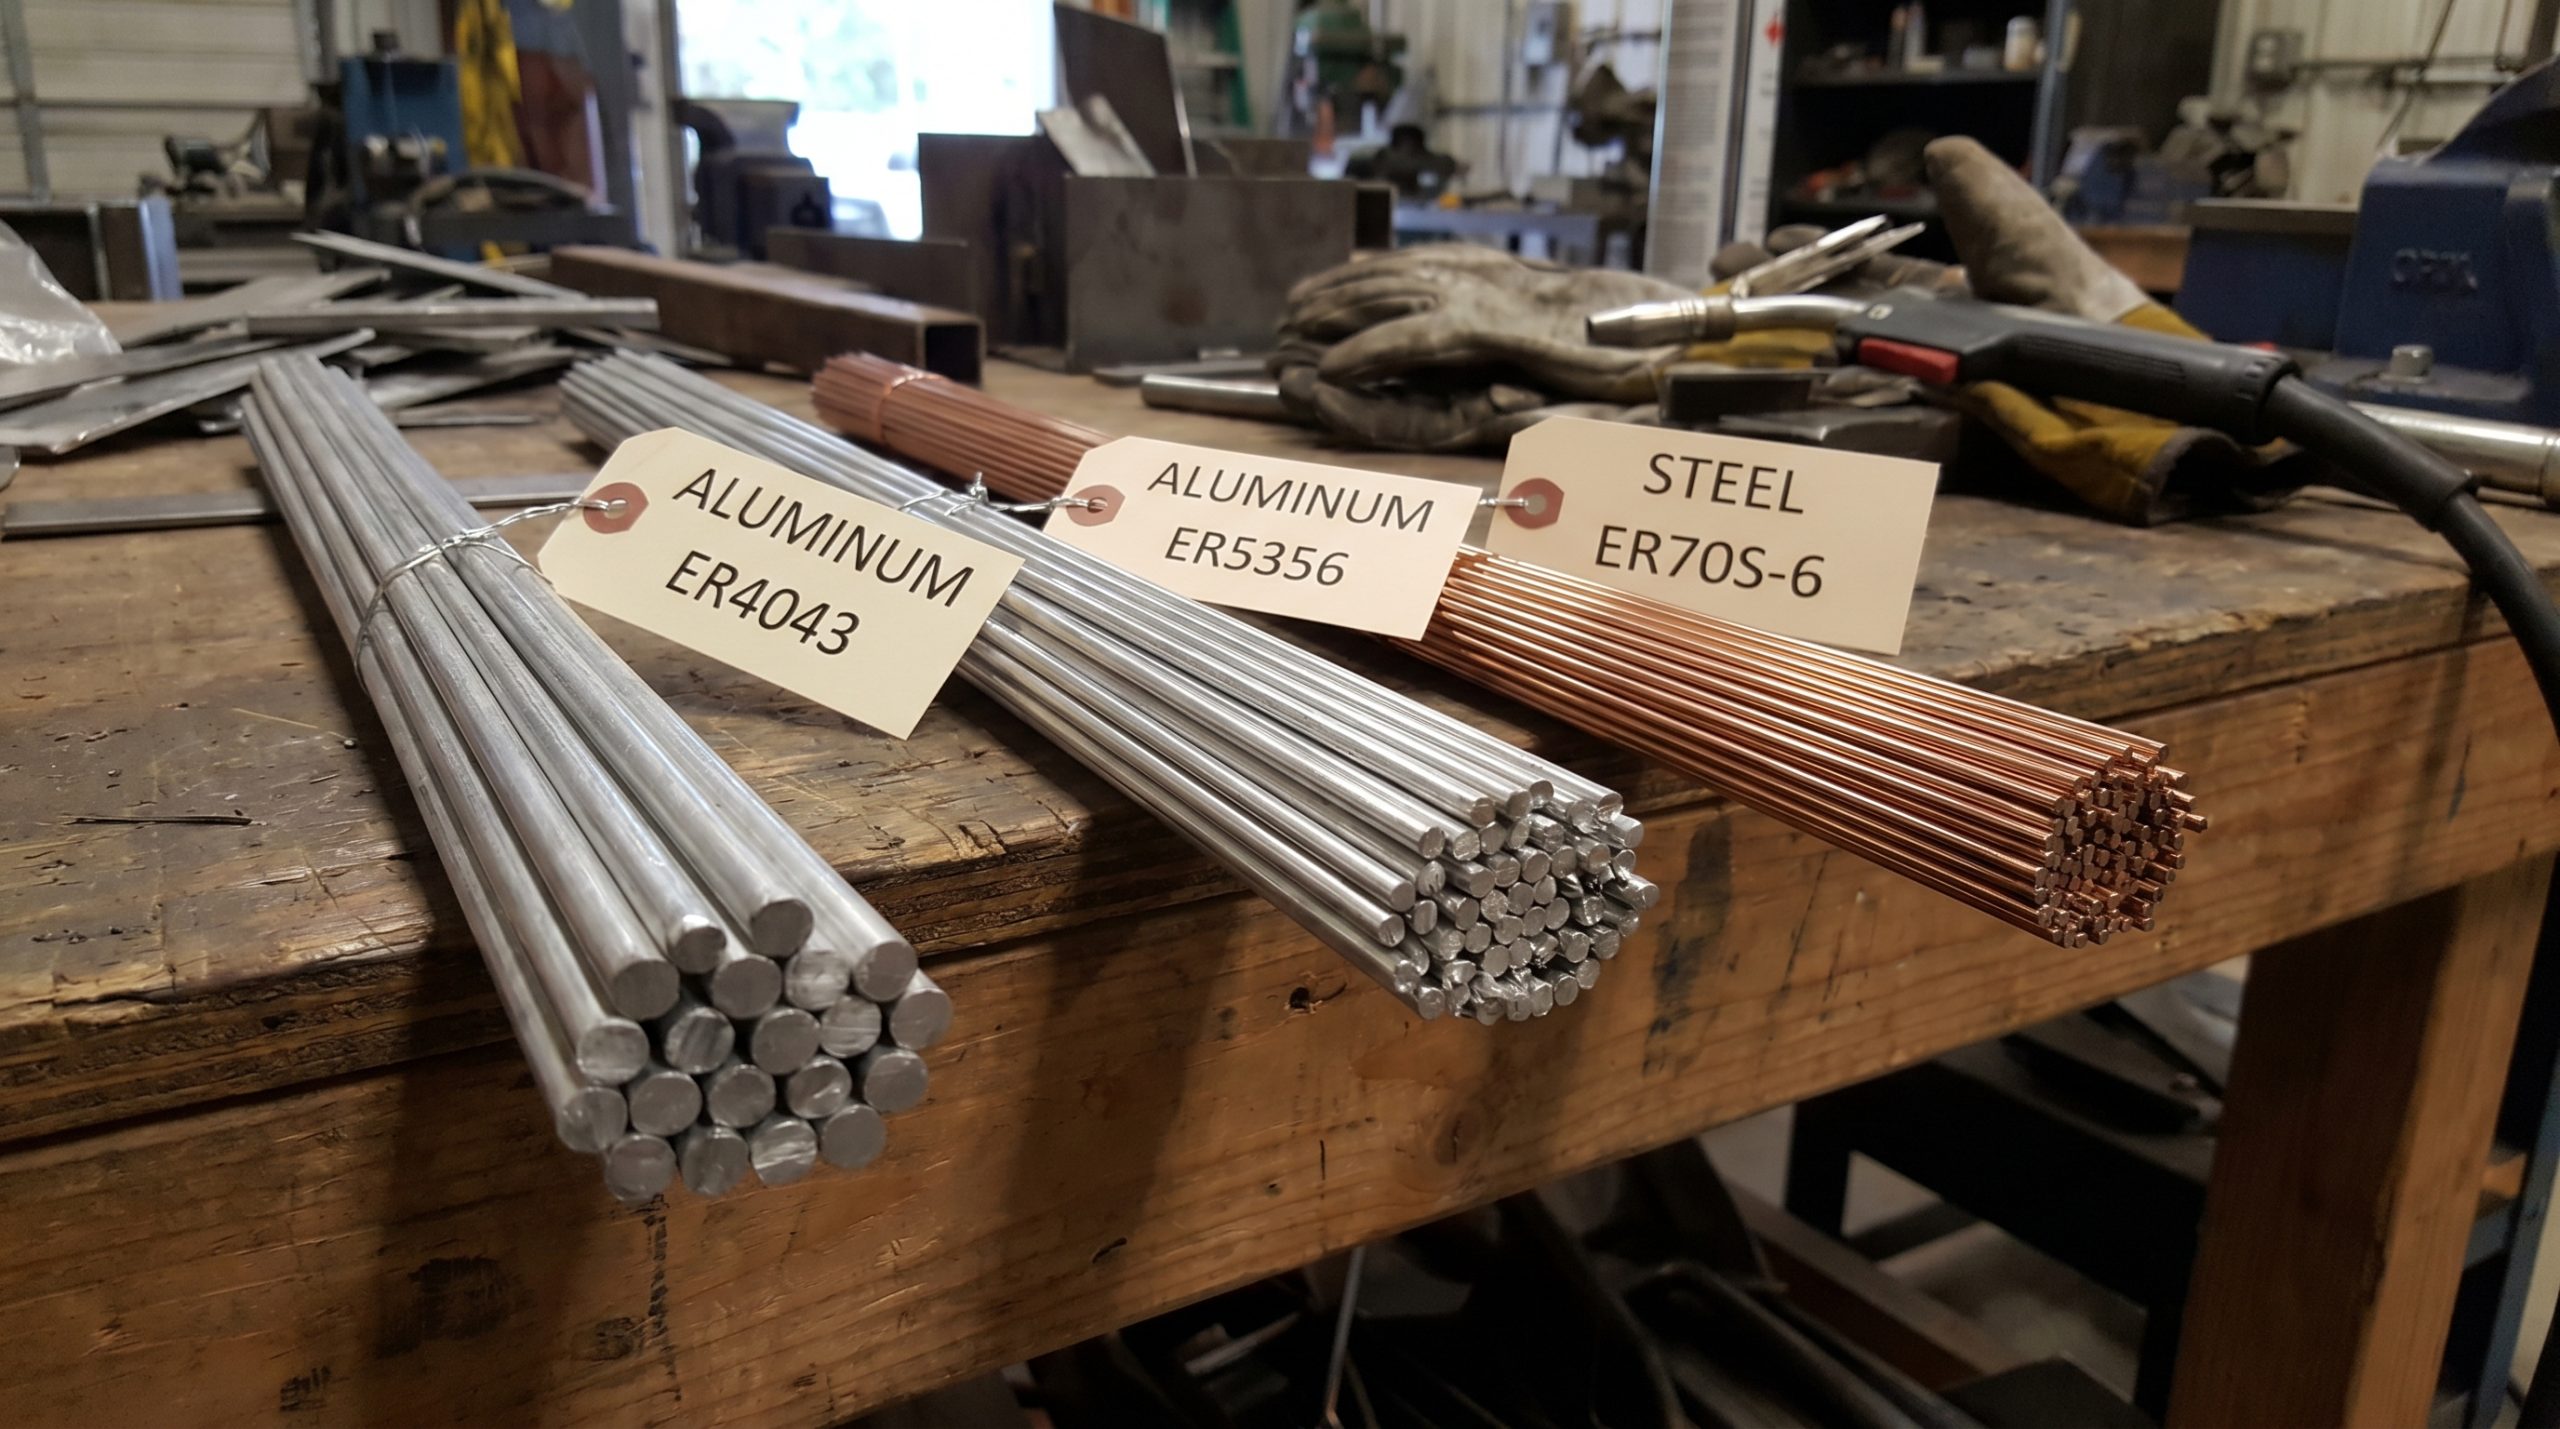
Aluminum requires specific alloy-matched filler rods like 4043 or 5356 to prevent hot cracking, whereas steel is often handled with a few versatile options like ER70S-6. Choosing the wrong filler in steel vs aluminum welding can lead to brittle joints that fail under the vibration of a heavy truck. Each filler material is engineered to complement the base metal’s chemistry and thermal expansion rates.
Selecting the right aluminum alloy
Aluminum filler selection is a precise science; using 4043 when you need 5356 can result in a weld that lacks the necessary ductility or corrosion resistance.
- ER4043: Best for general-purpose applications and bright finishes.
- ER5356: Ideal for structural strength and anodized parts.
- Compatibility: Always check the base alloy code (e.g., 6061-T6) before selecting your rod.
The versatility of steel filler rods
Steel fillers are generally more robust and can handle higher levels of surface contamination. For most structural projects, a standard silicon-deoxidized wire provides the strength and flow characteristics needed for a reliable bond.
- ER70S-6 is the industry standard for MIG welding mild steel.
- E7018 “low-hydro” rods are preferred for critical structural stick welding.
- Stainless steel requires its own dedicated 308L or 309L fillers.
Here’s the deal.
Key Takeaway
Correct filler selection is the foundation of a weld that can withstand the rigors of long-haul transportation and heavy-duty use.
| Metal Type | Common Filler | Key Benefit |
|---|---|---|
| Aluminum | ER4043 | Excellent flow and reduced cracking |
| Aluminum | ER5356 | Superior strength and ductility |
| Mild Steel | ER70S-6 | High deoxidizers for a cleaner bead |
Properly matching filler wire chemistry to the base metal prevents the chemical imbalances that lead to immediate or delayed cracking.
What equipment is best for steel vs aluminum welding?
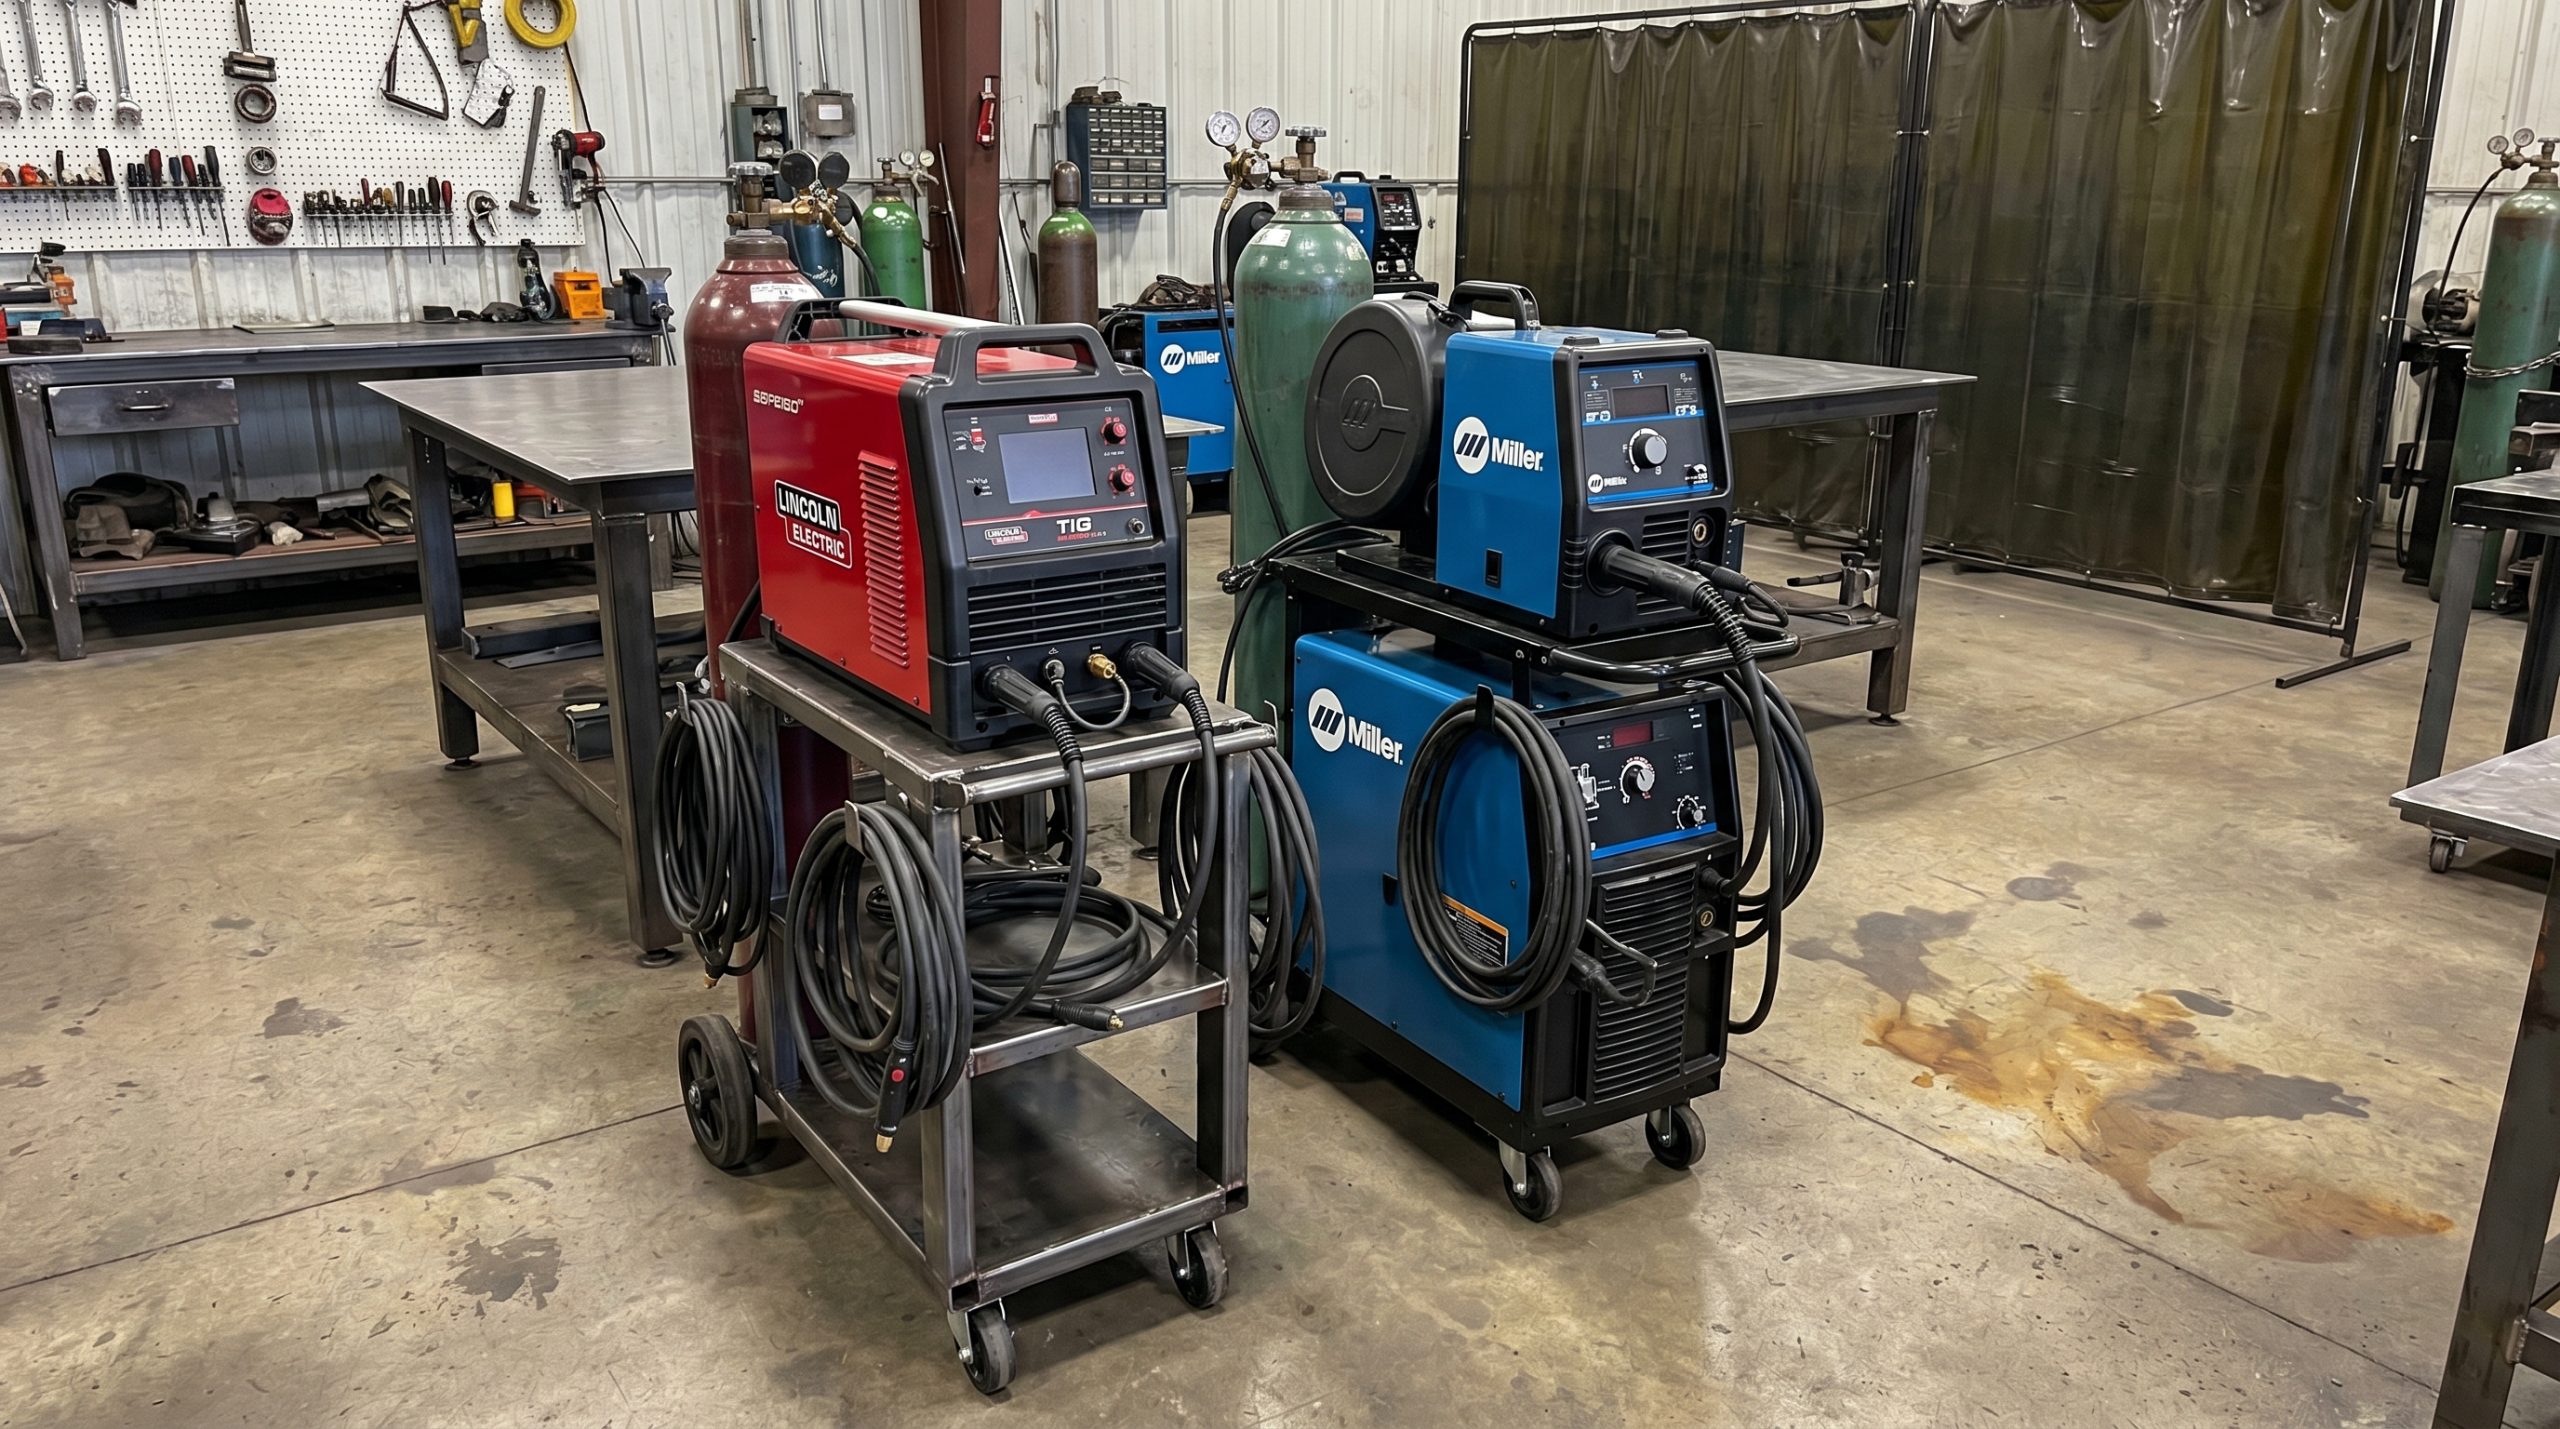
High-quality TIG machines with Alternating Current (AC) capability are the gold standard for aluminum, while Direct Current (DC) machines are perfectly suited for steel. When you are building precision components like aluminum Tool Boxes, your equipment choice is just as important as your skill level. The complexities of steel vs aluminum welding require specific power delivery systems to handle the different electrical properties of each metal.
Why AC is mandatory for aluminum
Aluminum welding requires AC because the positive half of the cycle “cleans” the oxide layer off the metal, while the negative half provides the penetration. Without this cleaning action, the weld will be contaminated and fail to fuse.
- AC balance control allows you to adjust the cleaning vs. penetration ratio.
- Frequency control helps focus the arc for tighter, more precise beads.
- Modern inverter machines offer pulse settings to further refine the heat.
DC power for consistent steel welds
Steel is much simpler electrically; a steady stream of DC power provides deep penetration and a stable arc that is easy to manage.
- DC Electrode Positive (DCEP) is standard for most MIG welding and stick welding.
- DC Electrode Negative (DCEN) is used for TIG welding steel to focus heat on the metal.
- Steel machines are generally more affordable as they don’t require complex AC inverters.
Ready for the next step?
Key Takeaway
Investing in the right equipment ensures you have the versatility to handle any material that enters your fabrication shop.
| Equipment Feature | Aluminum Setup | Steel Setup |
|---|---|---|
| Current Type | Alternating Current (AC) | Direct Current (DC) |
| Cleaning Action | Electrical oxide stripping | Manual prep only |
| Arc Focus | Higher frequency preferred | Standard frequency |
Advanced AC inverter technology is indispensable for managing the cleaning and penetration requirements of high-performance aluminum alloys.
Is gas shielding different in steel vs aluminum welding?
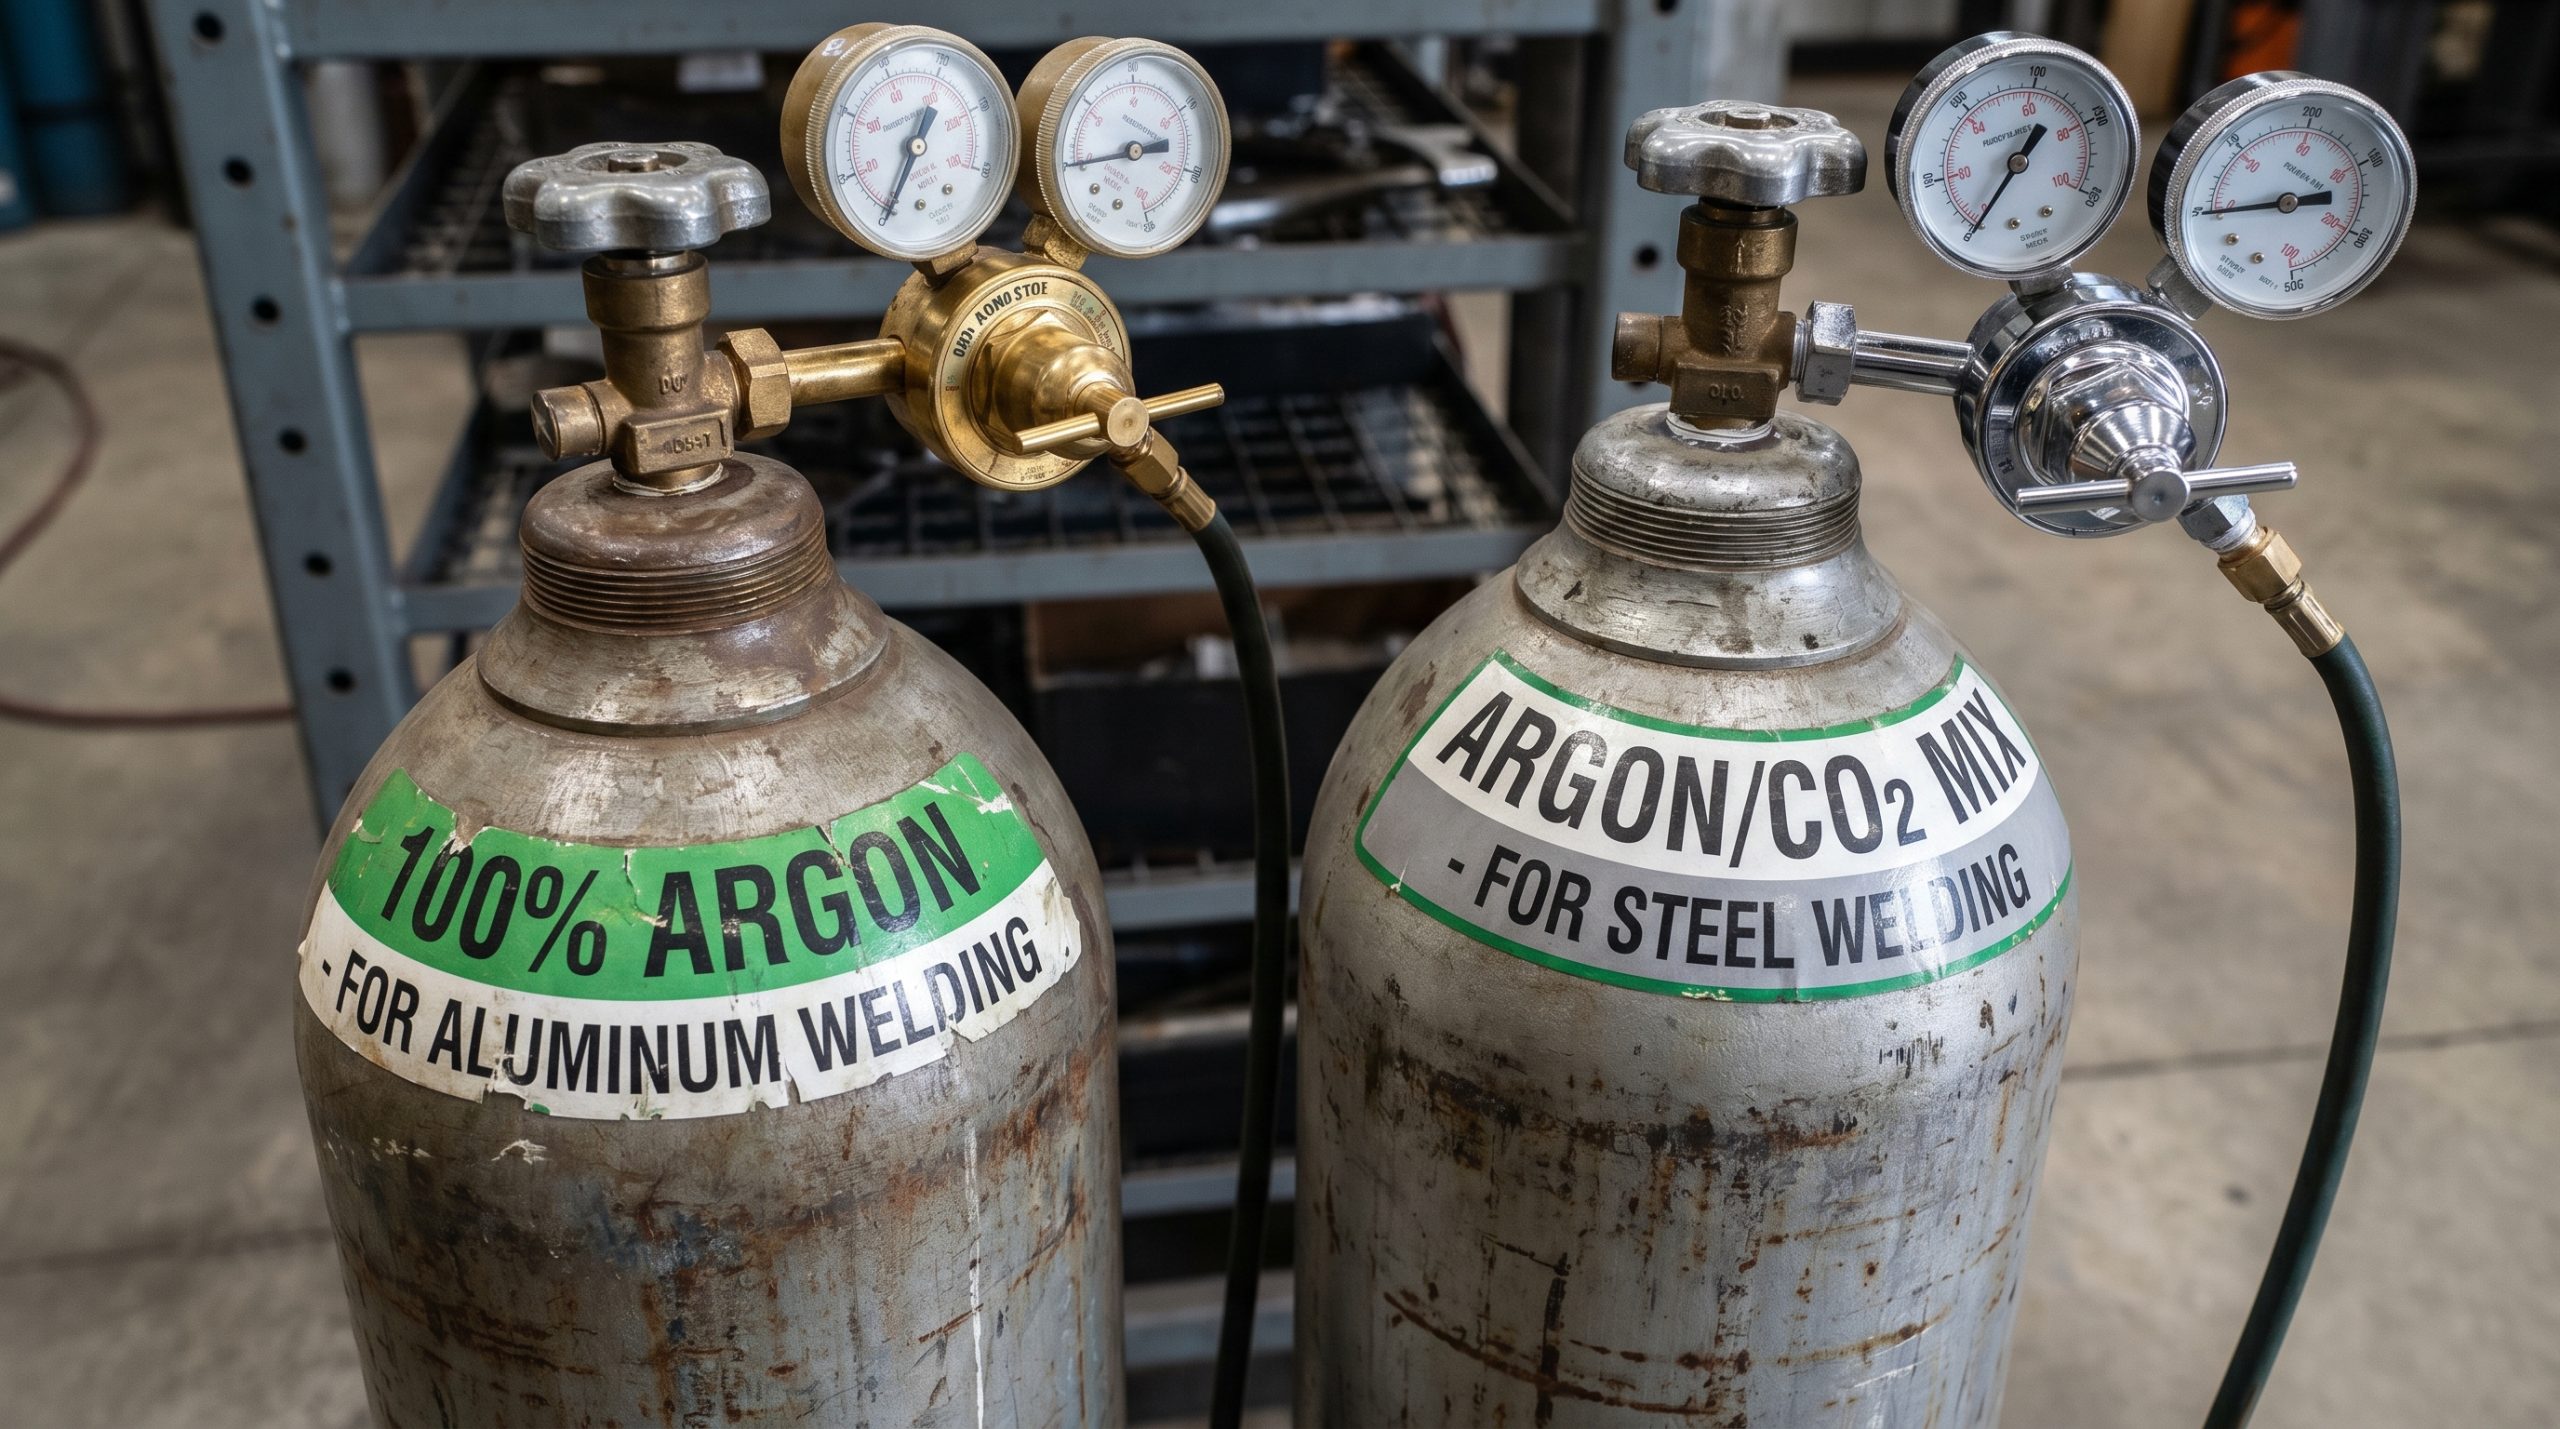
Aluminum welding depends exclusively on 100% pure Argon for its shielding needs, whereas steel welding often utilizes “C25” or Argon/CO2 blends. This is a critical distinction in steel vs aluminum welding because using a steel gas mix on aluminum will cause severe oxidation and a blackened, porous weld. The shielding gas protects the molten puddle from atmospheric gases like oxygen and nitrogen that cause brittleness.
The necessity of 100% Argon for aluminum
Pure Argon provides the stable arc and high heat intensity required to melt aluminum while preventing the atmospheric moisture from creating hydrogen porosity.
- Argon is an inert gas that does not react with the aluminum puddle.
- Helium blends can be added for extra heat on very thick aluminum plates.
- Flow rates are typically higher for aluminum to ensure full coverage.
Argon/CO2 blends for steel penetration
For steel, adding CO2 to the Argon mix increases the heat of the arc and improves penetration into the base metal. This “active” gas mixture helps create a wider, more stable puddle in MIG applications.
- 75% Argon / 25% CO2 is the most common mix for mild steel.
- Higher CO2 percentages increase spatter but offer deeper root penetration.
- Pure CO2 can be used for budget-friendly steel welding but results in a rougher finish.
You won’t believe how much this matters.
Key Takeaway
Using the correct gas mixture is the easiest way to avoid porosity and ensure your welds are clean and aesthetically pleasing.
| Gas Property | Aluminum Shielding | Steel Shielding |
|---|---|---|
| Primary Gas | 100% Pure Argon | Argon / CO2 Blend |
| Gas Type | Completely Inert | Active / Inert Mix |
| Impact on Weld | Smooth, clean surface | Deep penetration, some spatter |
Shielding gas chemistry must be precisely matched to the metal type to prevent chemical reactions that compromise the metallurgical integrity of the joint.
Does distortion vary in steel vs aluminum welding?
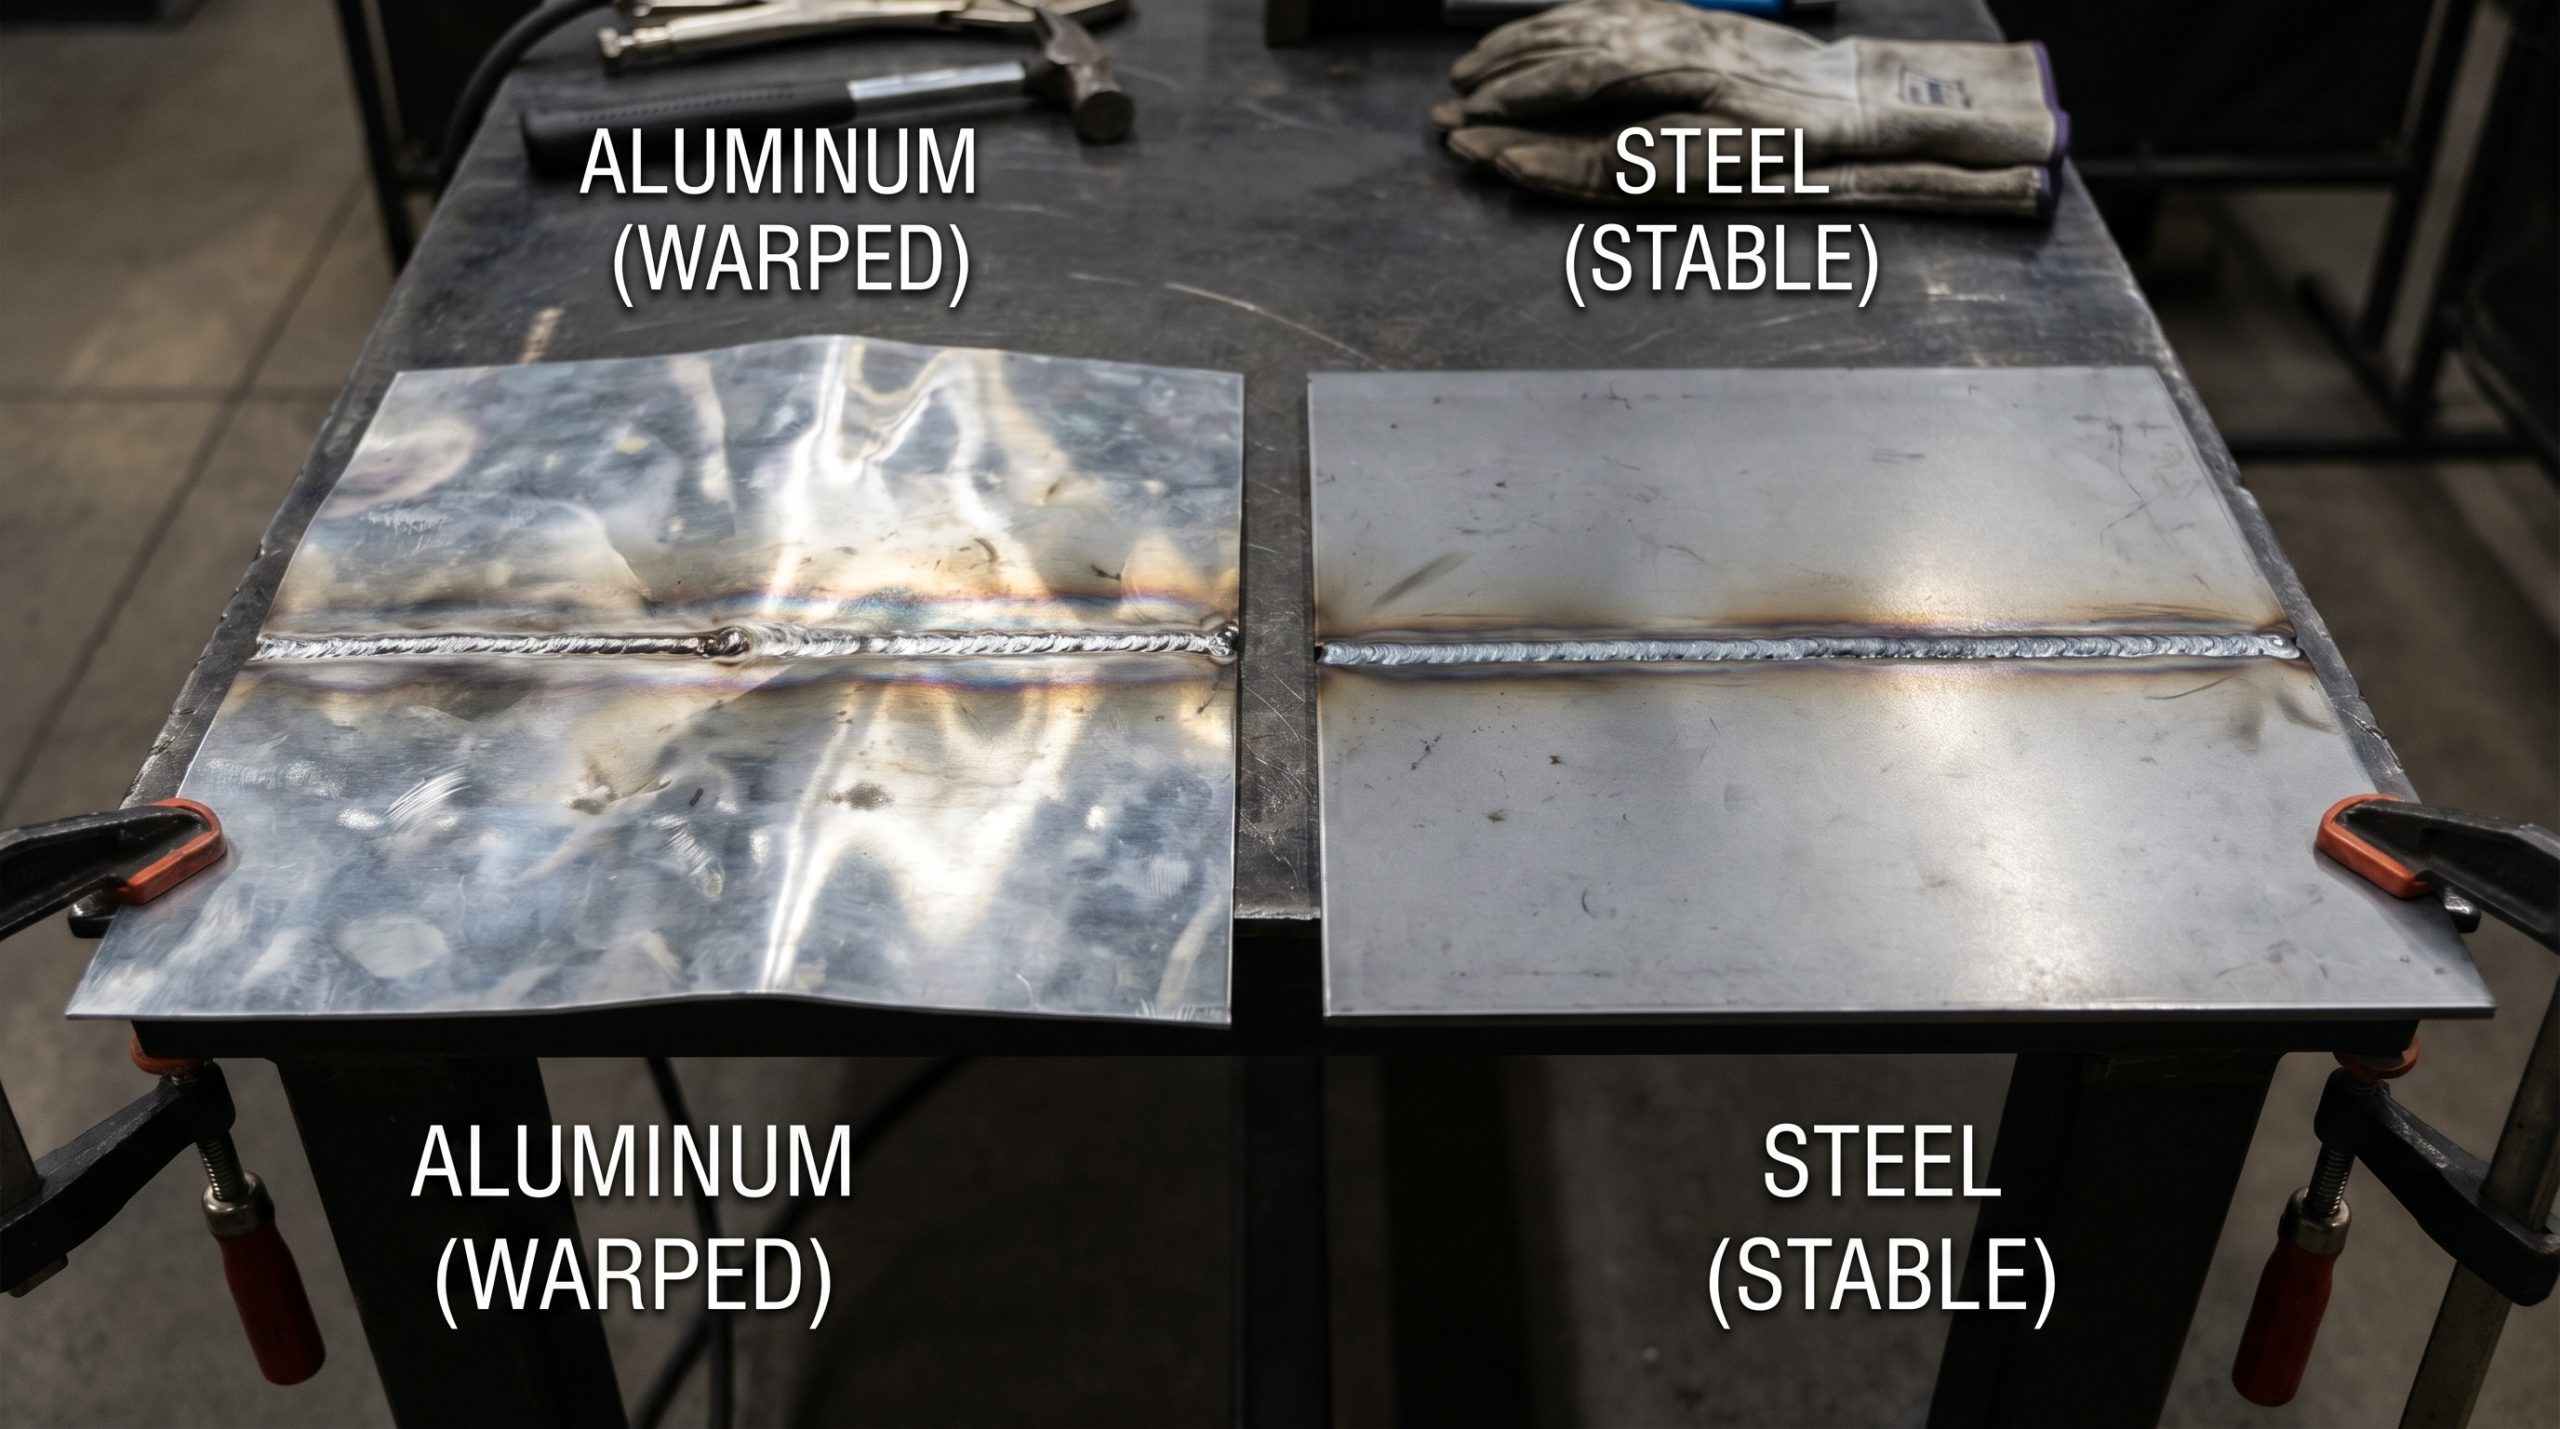
Aluminum expands and contracts significantly more than steel when exposed to heat, leading to much higher rates of warping and distortion. This physical reality is a major factor in steel vs aluminum welding when you are assembling large structural units like Moose Bumpers. If you don’t account for this movement, your final assembly may not fit the vehicle or could suffer from internal stresses that lead to premature failure.
Managing high expansion in aluminum
Because aluminum moves so much, you must use more frequent tack welds and specialized clamping techniques to keep the parts in alignment.
- Increase the number of tacks compared to a similar steel joint.
- Use a “back-stepping” technique to distribute heat more evenly.
- Allow the metal to cool slowly; never quench aluminum with water.
Steel’s relative stability
While steel still warps, its lower expansion rate and higher structural rigidity make it much easier to keep straight during long production runs.
- Standard clamping and jigging are usually sufficient.
- Heat can be used strategically to “pull” a warped steel part back into shape.
- Steel’s resistance to movement allows for longer continuous weld beads.
Let’s look at the numbers.
Key Takeaway
Proactive distortion management ensures your custom fabrications maintain their precision dimensions from the first tack to the final bead.
| Distortion Factor | Aluminum Behavior | Steel Behavior |
|---|---|---|
| Expansion Rate | High (High risk of warping) | Moderate (Easier to manage) |
| Tack Frequency | Very high (every 2-3 inches) | Moderate (every 6-10 inches) |
| Post-Weld Cooling | Air cool only | More resilient to rapid cooling |
Predicting and compensating for thermal expansion is vital for maintaining the strict tolerances required in heavy-duty automotive fabrication.
Can you use the same tools for steel vs aluminum welding?
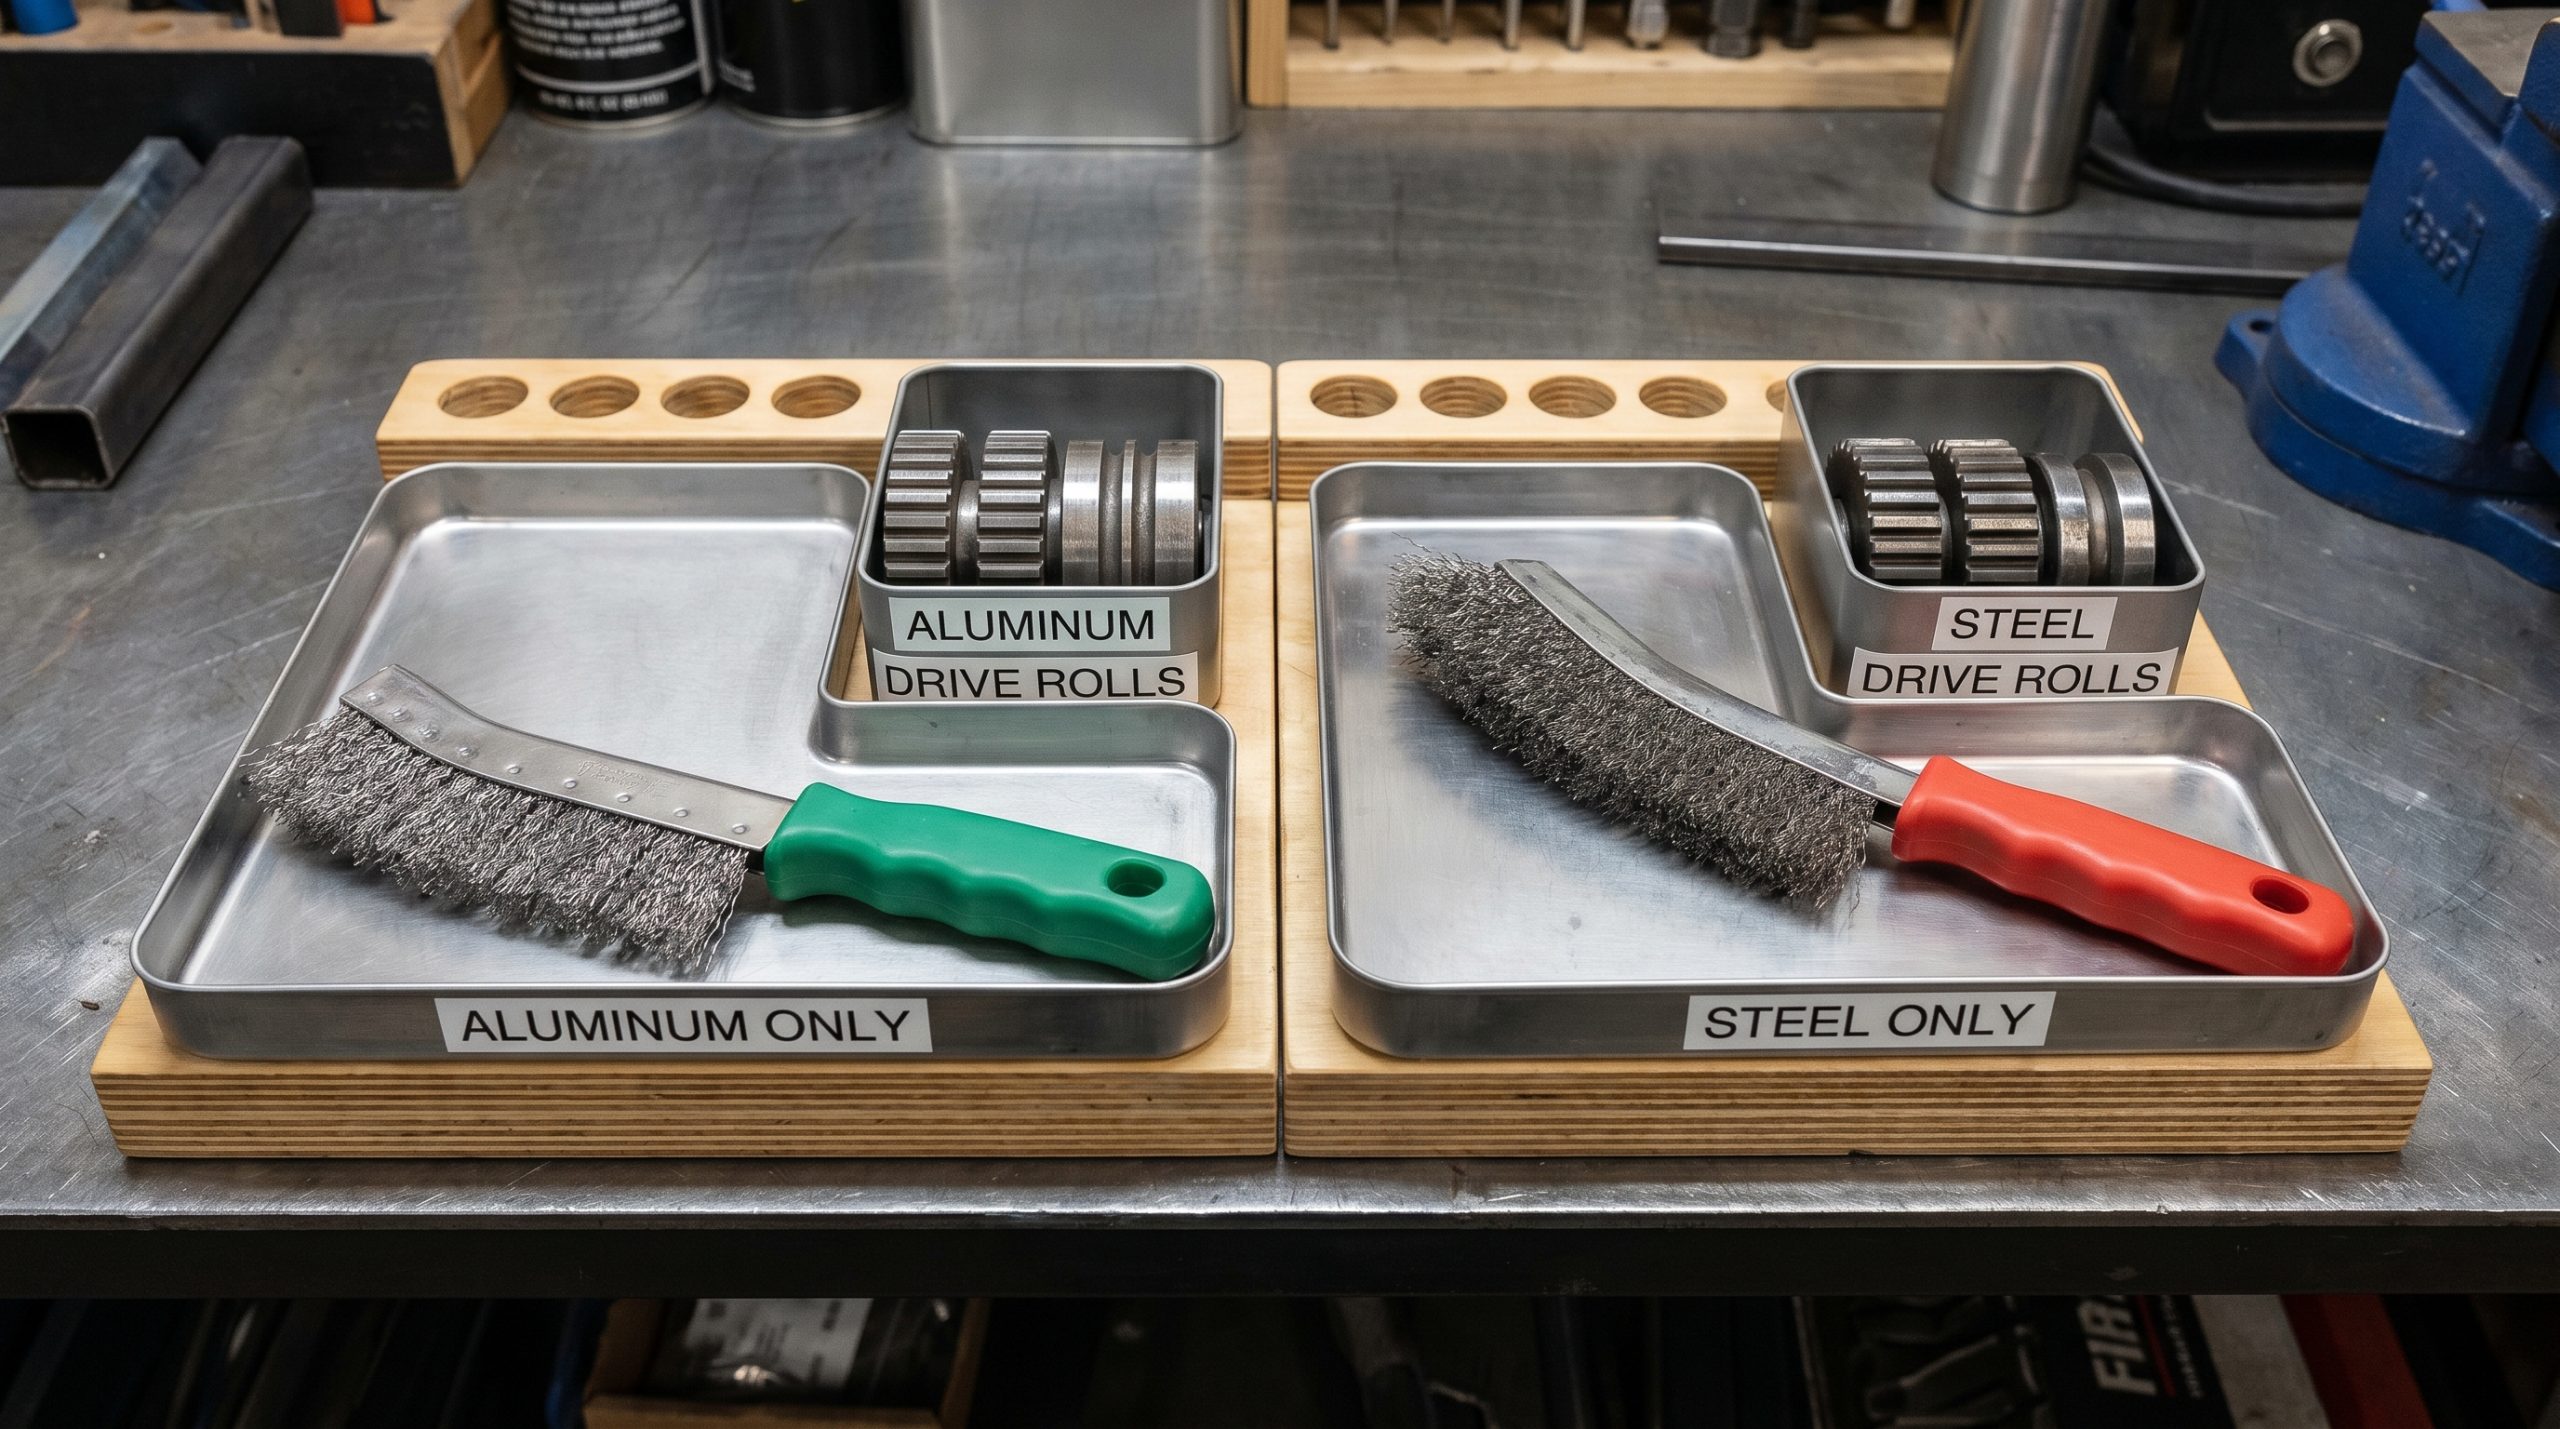
Sharing tools between these two metals is a dangerous practice because carbon steel particles can embed themselves into aluminum and cause galvanic corrosion. This is a fundamental rule of steel vs aluminum welding that many hobbyists overlook to their detriment. To maintain the quality of your shop, you must maintain separate sets of brushes, grinders, and even workspaces.
Avoiding cross-contamination
Cross-contamination often leads to “pitting” or white rust on aluminum surfaces long after the welding is finished. This is especially critical for parts exposed to road salt and harsh environments.
- Never use a wire brush on aluminum that has been used on steel.
- Use dedicated aluminum-only grinding wheels and sanding discs.
- Store aluminum filler rods in sealed containers to prevent dust accumulation.
Specialized wire feeding equipment
Aluminum wire is much softer than steel wire, meaning it can easily “bird-nest” or tangle inside a standard MIG welder. You need specialized hardware to feed it reliably.
- Spool Guns: Keep the wire close to the arc to prevent tangling.
- Push-Pull Systems: Ideal for high-production aluminum environments.
- U-Groove Rollers: Use these instead of V-groove rollers to avoid crushing the soft wire.
But there’s a catch.
Key Takeaway
Maintaining strict tool separation is the only way to guarantee the long-term corrosion resistance and professional finish of your aluminum projects.
| Tool Category | Aluminum Requirement | Steel Requirement |
|---|---|---|
| Brushes | Stainless steel (new) | Carbon steel or stainless |
| Drive Rolls | U-Groove (soft) | V-Groove (hard) |
| Grinding Wheels | Non-loading aluminum discs | Standard masonry/metal discs |
Strict segregation of tools and consumables is a non-negotiable requirement for shops aiming for high-quality, corrosion-resistant aluminum output.
Which is harder to learn: steel vs aluminum welding?
Aluminum is widely considered more difficult to master because it requires faster hand speed, better heat management, and offers almost no visual temperature cues. When you are learning the ropes of steel vs aluminum welding for products like Pickup Bumpers, starting with steel is always recommended. Steel’s slower pace and “orange glow” provide a much more intuitive learning curve for beginners.
Why beginners start with mild steel
Mild steel is the ultimate teacher because it is predictable and gives you plenty of time to react to the puddle’s behavior.
- The visual feedback of the heat makes it easy to see if you are going too slow.
- The arc is more stable and less sensitive to minor hand tremors.
- Standard DC equipment is easier to set up and troubleshoot.
The fast-paced challenge of aluminum
Welding aluminum is often described as “trying to weld a wet noodle with a lightning bolt.” It requires a high level of hand-eye coordination to keep up with the melting rate.
- You must be comfortable moving 2-3 times faster than you would with steel.
- Learning to use a foot pedal is essential for controlling the heat sink.
- The puddle is much more fluid and can fall out of the joint if you’re not careful.
It gets even more interesting.
Key Takeaway
Developing mastery over both metals makes you a versatile and highly valued professional in the competitive fabrication industry.
| Learning Factor | Aluminum Difficulty | Steel Difficulty |
|---|---|---|
| Visual Feedback | Poor (no color change) | Excellent (glows orange) |
| Travel Speed | Fast (requires high precision) | Moderate (more forgiving) |
| Skill Plateau | High (takes months/years) | Moderate (fast basic mastery) |
Aluminum welding requires a higher level of “muscle memory” and sensory awareness due to the speed and lack of visual temperature indicators.
What are the costs of steel vs aluminum welding?
Aluminum welding is significantly more expensive than steel due to the higher cost of pure Argon, specialized filler materials, and the increased labor time required for preparation. While steel vs aluminum welding involves similar basic principles, the “overhead” for non-ferrous work is higher across the board. However, the lightweight and corrosion-resistant nature of aluminum often provides a better return on investment over the lifecycle of a vehicle.
Consumables and gas price comparisons
Everything from the gas in the cylinder to the wire on the spool costs more when you switch from steel to aluminum.
- Pure Argon is more expensive per cubic foot than Argon/CO2 blends.
- Aluminum filler wire is sold in smaller spools and has a higher price per pound.
- Consumables like contact tips and liners wear out faster on aluminum rigs.
Labor and preparation overhead
Because aluminum is so sensitive to contamination, you will spend more time cleaning and prepping the joints than you will actually welding them.
- Intensive chemical and mechanical cleaning adds to the hourly labor cost.
- The need for separate tools and workspaces increases shop overhead.
- Highly skilled aluminum welders typically command higher wages.
Here is the bottom line.
Key Takeaway
Evaluating the total cost of ownership allows you to make informed decisions about material selection for your heavy-duty fabrication projects.
| Cost Element | Aluminum Welding | Steel Welding |
|---|---|---|
| Shielding Gas | High (Pure Argon) | Moderate (Mix) |
| Filler Rods | Expensive per pound | Economical |
| Labor Time | High (Prep-intensive) | Moderate |
While the initial fabrication costs are higher for aluminum, its weight savings and durability often result in lower total operating costs for the end-user.
Conclusion: Engineering for Longevity
Mastering the technical distinctions between aluminum and steel is the hallmark of a professional manufacturer. By respecting the thermal expansion of aluminum and the structural stability of steel, you ensure every joint is built to withstand the harshest North American road conditions. Whether you are building the next generation of heavy-duty truck bodies or refining your shop’s efficiency, the right knowledge is your most valuable tool.
Ready to start your next heavy-duty project?
If you need expert guidance on heavy-duty truck protection or custom fabrication that meets the most demanding specifications, contact us today to discuss your requirements with our engineering team.
*
Frequently Asked Questions
Can I weld aluminum with a standard steel MIG welder?
Only if the machine has enough amperage and you install a spool gun and pure Argon gas. Aluminum is much softer and more conductive than steel, so trying to push it through a standard steel liner will lead to immediate tangling.
What is the best way to tell aluminum and steel apart before welding?
A magnet is the simplest and most reliable tool. Steel is magnetic and will strongly attract the magnet, whereas aluminum is non-magnetic and will have no reaction whatsoever.
How do I know if my aluminum weld is clean enough?
A clean aluminum weld will have a bright, shiny “dime-stack” appearance without black soot or brown frosting. If you see dark gray or black deposits, it is a sign of poor shielding gas coverage or inadequate surface preparation.
Can I use the same welding helmet for both metals?
Yes, but you may need to adjust your shade settings. Aluminum produces a much brighter arc than steel due to its reflective surface, so you typically need to use a darker shade (such as 11 or 12) to protect your eyes effectively.
How long should I wait between cleaning and welding aluminum?
Ideally, you should weld the joint immediately after cleaning. If the metal sits for more than 4 to 8 hours, the oxide layer will begin to reform, and you will need to re-clean the surface to ensure a quality bond.